Welcome To Your New Phone!
This guide will help you get up and running with your new phone as soon as possible. It tells you how to use your phone and the more commonly used features. The easiest and most flexible way of configuring call forwarding and other great features is using the LFT Fiber All Business Web Portal, called ExecCONNECT. With ExecCONNECT you can set up voicemail and create call routing schemes (like routing calls to your mobile phone if you're not at your desk). While you can still use the familiar "star" codes (like dialing *69 to return the most recent incoming call), ExecCONNECT makes it much easier to manage your Hosted Voice experience. Please note that this Guide is representative and may vary from your individual ExecCONNECT screen based on the settings chosen by your company's designated administrator.
Introducing ExecCONNECT
ExecCONNECT provides a web interface to your phone settings and allows you to:
- Change your phone's and phone system's settings
- View recent calls
- View and listen to your voicemails
- Manage your contacts
- Set up rules to route your calls
- And much more
Accessing And Logging In
To access ExecCONNECT, navigate to https://voicemail.lusfiber.net.
The following shows a sample ExecCONNECT login page. To log into ExecCONNECT, enter your 10-digit phone number and your password (LFT Fiber's default password is 1235), then click Login.

If you have forgotten your password, please contact customer support.
Using ExecCONNECT
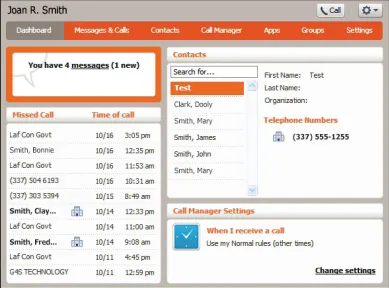
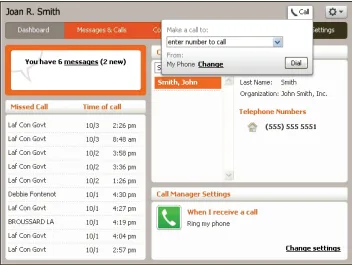
Once you have logged in, you will see the ExecCONNECT Dashboard. This gives you a quick, at-a-glance summary of your messages, missed calls, contacts and phone settings.
Along the top of the window are a series of tabs which you can select to take you to the different pages within ExecCONNECT.
Dashboard - This is the at-a-glance summary you see when you first log into ExecCONNECT.
Messages & Calls - This shows you all of your voice and fax messages, and the calls you've made, answered, missed, rejected or deleted.
Contacts - You can add and view all of your contacts and their phone numbers in this tab.
Call Manager - The Call Manager page lets you configure the services on your phone line, like Call Forwarding and Selective Call Rejection.
Apps - Add available applications to your service.
Groups - Here you can view any groups your line is part of in your business, such as hunt groups. You can also login and logout of groups here. This tab will only be visible if your line is part of a hunt group or Call Pickup Group.
Settings - The Settings page gives you access to numerous other options, such as changing your passwords and PINs, and configuring the keys on your phone.
Using the functions in each of these pages is described in more detail in this User's Guide.
Getting Help
If you need assistance with using ExecCONNECT, you can click on the icon and select Help. This will cause another browser window to pop-up with help for the page you are currently using:
Refreshing A Page
If you want to refresh a page (for example to check whether you've received any new voicemails since you last looked), click on the icon and choose Refresh.
Logging Out
If you don't use ExecCONNECT for 30 minutes you will be automatically logged out. However, if you wish to manually log out, (for example because you've been accessing ExecCONNECT using a shared computer), you can do this by clicking the icon and selecting Logout.
ExecCONNECT Dashboard
The ExecCONNECT Dashboard is shown when you log into ExecCONNECT and gives you an at-a-glance summary of your phone line. In this section we'll examine the Dashboard in more detail.
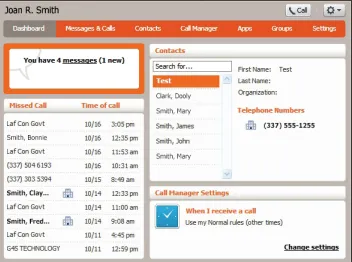
Messages
In the top left hand corner of the Dashboard screen, you can see if you have any new voice messages.

To view and listen to new messages, click on the messages link. This will take you to the Messages & Calls page, which is described in Section 4.
Missed Calls
This section shows you the most recent calls which you have missed. To see other types of calls, go to the Messages & Calls page, which is described in Section 4.

Call back
To call back a phone number whose call you missed using Click To Dial, follow these steps:
- Under Missed Call, click on the phone number or name of the caller.
- Select the Dial option. You can choose to dial from your desk phone or from another number.Your phone will ring; you must answer it in order for the selected phone number to be dialed.
Contacts
The Contacts section displays all of your contacts and allows you to search within them.
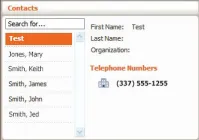
To search, begin entering the name you want to search for in the text box. ExecCONNECT will narrow down the contacts displayed as you type and will highlight the text that matches your search in yellow.

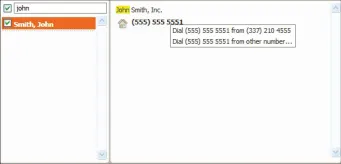
Calling a contact
To call a contact using Click To Dial, follow these steps:
- Click on the phone number of the contact you wish to call.
- Select the Dial option. You can choose to dial from your desk phone or from another number.Your phone will ring; you must answer it in order for the selected phone number to be dialed.
Settings
Your main settings will be shown at the bottom right of ExecCONNECT. This shows you the current status of your main phone line settings.
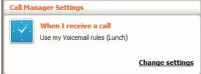
In the example above, a Weekly Schedule rule is active. To change these settings, you can either click on the Change settings link, or select the Call Manager page, described in Section 6.
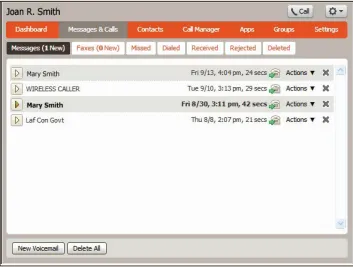
Messages & Calls
The Messages & Calls page has a number of sections which you can select by clicking on the tab.
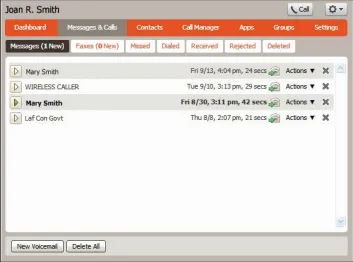
Messages - shows you all of your new and stored voice messages.
Faxes - shows you all of your new and stored faxes (if you subscribe to a fax line).
Missed - displays the recent calls you have received and not answered.
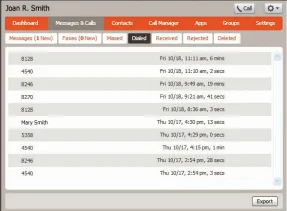
Dialed - displays the recent calls you have made, including those made by Click To Dial as described in Section 10.
Received - shows the recent calls you have answered.
Rejected - shows the recent calls you have rejected.
Deleted - displays the voice mails you have chosen to delete and allows you to restore or permanently delete them.
Each of these sections is described in more detail below.
Messages
The Messages page shows you all stored voice messages, both those you have listened to and those you haven't. Unheard messages are shown in bold and are indicated with a gold play icon.
Listen to a message
To listen to a message click on the gold play icon to the left of the message. This will pop up a Voicemail player which loads and plays the message.

Deleting a message
To delete voice messages, click on the Delete All button at the bottom of the player or you can delete individual calls by clicking on the Delete icon (x) on the Messages page.
Marking a message as heard
Listening to a voice message will mark it as heard. If you want to mark a new message as heard without listening to it, follow these steps:
- Click on the Actions dropdown to the right of the message.
- Select Mark as heard from the dropdown.
Marking a message as new
Once a message has been listened to it can be marked new; follow these steps:
- Click on the Actions dropdown to the right of the message.
- Select Mark as new from the dropdown.

Call back
To call back someone who left you a voice message, follow these steps:
- Click on the number or name of the caller.
- Select the Dial option. You can choose to dial from your desk phone or from another number.Your phone will ring; you must answer it in order for the selected phone number to be dialed.
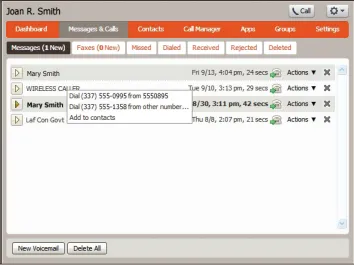
Add caller to contacts
To add the number of someone who left you a voice message to your Contacts, follow these steps:
- Click on the number or name of the caller.
- Select the Add to Contacts option.
- This will take you to the Contacts page. Enter the details for your new contact.
- Click Save.
Faxes
The Faxes section shows you the recent faxes you have received.
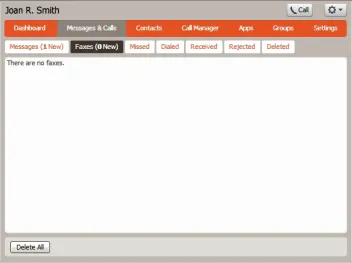
To delete all faxes you have received, click Delete All at the bottom.
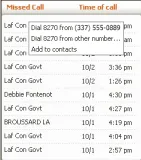
Missed
The Missed section shows you the recent calls that you have received but did not answer.
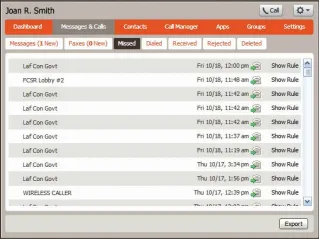
If a caller is in your Contacts list, then their name will be shown instead of their phone number. A single click on the name will display that Contact's stored information. You can call back any of the numbers from which you missed a call. You can also add them to your contacts list by clicking on the name or number that called you.
Dialed
The Dialed page shows you all of the recent calls you have made, including those which you made using Click To Dial (described in Section 10). You can use the Click To Dial feature on any of the numbers on this list. You can also add them to you Dailed contacts.
Received
The Received page shows you all of the recent calls you have answered.

You can use the Click To Dial feature on any of the numbers on this list. You can also add them to your contacts.
Rejected
The Rejected page shows you all of the voice messages that you have rejected.
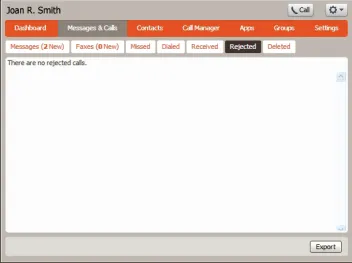
You can use the Click To Dial feature on any of the numbers on this list. You can also add them to your contacts.
You can also choose to export calls from the Rejected page into an Excel spreadsheet. To export calls, follow these steps:
- Click on Export.
- Select which calls you want to export. You can choose a combination of Received, Missed, Dialed and Rejected calls.
- Click Export.An Excel spreadsheet with the exported calls will begin to download.
Deleted
The Deleted page shows you all of the voice messages that you have deleted.
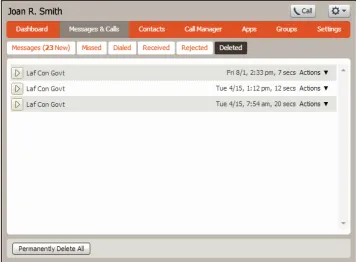
You can use the Click To Dial feature on any of the numbers on this list. You can also add them to your contacts.
Restore Voice Mails
To restore a voice mail marked as deleted, from the Actions dropdown, select Restore. Restored voice mails will be moved from the Deleted section to the Messages section.
Permanently Delete Individual Voice Mails
To permanently delete voice mail, go to the Actions dropdown and select Delete Permanently. You may delete every message at once by clicking Permanently Delete All in the lower left corner of the screen.
Contacts
The Contacts page consists of a number of different sections, which you can select by clicking on the tabs.
- Contact List - allows you to manage your personal contacts list.
- Speed Dials - allows you configure your numeric speed dials.
- Extensions - shows you the extensions within your business.
- Short Codes - shows you the numeric speed dials set up for your business.Each of these sections is described in more detail below.
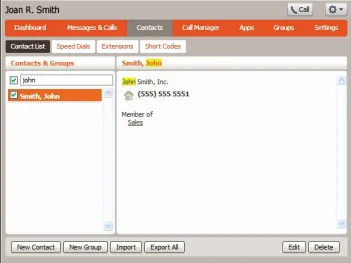
Contact List
The Contact List shows you all of your contacts.
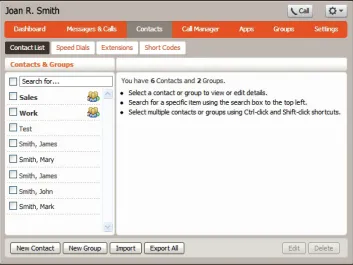
Search for a specific item using the search box to the top left.
Searching
To search, begin entering the name you want to search for in the text box. ExecCONNECT will narrow down the contacts displayed as you type and will highlight the text that matches your search in yellow.
To cancel the search and view all of your contacts, delete the search text you entered.
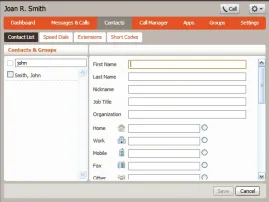
Add a new contact
To add a new contact, follow these steps:
1. Click on New Contact.
2. Enter the details for your new contact in the text boxes provided.
3. Enter any phone numbers for your contact in the text boxes provided.1 You can select the radio button to the right of a number to indicate that it is the preferred "Main" number for this contact.
4. Enter any addresses for your contact in the text boxes provided.
5. Click Save. Your new contact has now been added to your Contacts list.
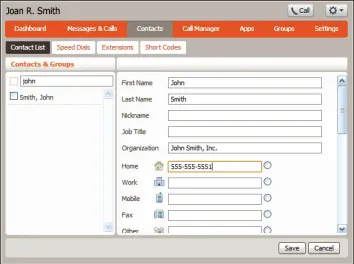
Editing a contact
To edit a contact, follow these steps:
- Select the contact you wish to edit from the list on the left hand side of the screen.
- Click Edit.
- Modify or add any details.
- Click Save.
Deleting a contact
To delete a contact, follow these steps:
- Select the contact you wish to delete from the list on the left hand side of the screen.
- Click Delete.
Calling a contact
To call a contact using Click To Dial, follow these steps:
- Click on the phone number of the contact you wish to call.
- Select the Dial option. You can choose to dial from your desk phone or from another number.Your phone will ring; you must answer it in order for the selected phone number to be dialed.
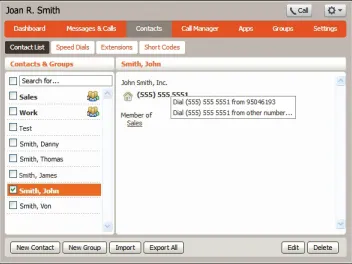
Groups
You can manage your contacts by assigning them to groups. For example, you might have a group for "Work" contacts and another group for "Personal" contacts.
To add a new group, follow these steps:
- Click New Group.
- Enter a name for the group in Group Name.
- Enter an ID for the group in Telephone ID.
- Select any contacts you want to be in the group from the list on the right hand side.
- Click Save.
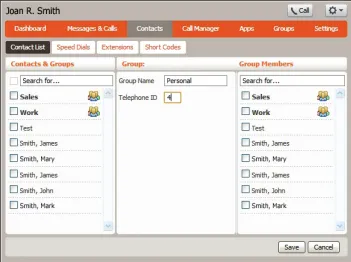
Figure 28: Adding a new groupThe new group will now appear in the Contacts & Groups section.

By selecting a group you can search within it for the group members by using the Search for box on the right hand side of ExecCONNECT.To edit a group, follow these steps:
- Select the group on the left hand side.
- Click Edit.
- Change the group settings or members as desired.
- Click Save.
To delete a group, follow these steps:
- Select the group on the left hand side.
- Click Delete.
Speed Dials
The Speed Dials section allows you to configure numeric speed dials:
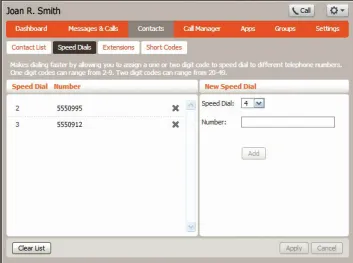
One digit codes can range from 2-9. Two digit codes con range from 20-49.
Use these speed dials by dialing the one or two digit speed dial number on your phone. They are different from speed dials which are assigned to particular keys on your phone. For more information on setting up speed dials on your phone's keys, see Section 9.1.4.
Adding a speed dial
To add a speed dial, follow these steps:
- Select the number for the speed dial you'd like to set up from the Speed Dial drop down list.
- Enter the phone number this speed dial should call, as you would dial it. For example, if you dial 9 before a number to make a call, enter 9 and the number here.
- Click Add.
- Repeat steps 1-3 for any other speed dials you want to set up.
- Click Apply to save your changes.
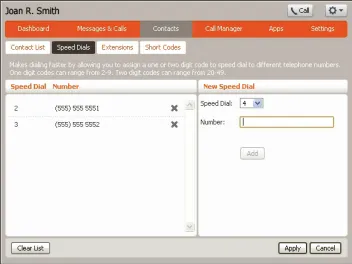
Deleting a speed dial
To delete an individual speed dial, follow these steps:
- Click on the Delete icon to the right of the speed dial number.
- Click Apply.
To delete all of your speed dials, follow these steps:
- Click Clear List.
- Click Apply.
Extensions
The Extensions section lists all of the extensions in your business as set up by your company's designated administrator.

Your company's designated administrator sets up these extensions. If you have questions about your extension or would like to change the numbers assigned to you, please contact your company's designated administrator.
Short Codes
The Short Codes section shows you all of the speed dials set up for all the phones in your business.
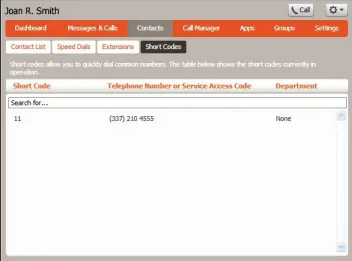
You can dial these short codes from any phone in the business to reach the assigned number. Your company's designated administrator sets up these short codes. If you have questions about the short codes created for your company, please contact your company's designated administrator.
Incoming Call Manager (ICM)
For end users who want a highly-customizable call handling service, Incoming Call Manager (ICM) provides more flexible and detailed configurations. ICM provides you with a powerful rules-based routing service, allowing you to configure when, where and which calls are delivered to you. Use the advanced rules-based routing to configure an advanced Set of Rules for your incoming calls. For example, you might want to forward calls from family and friends to a home phone, while forwarding calls from the office directly to voicemail, or to screen calls from a particular number.
This section provides information on how to configure Incoming Call Manager.
- Summary - provides a description of what will happen to incoming calls.
- Rules - allows you to view and change your Call Forwarding settings.
- Weekly Schedule - allows you to apply different routing rules based on time of day and day of week.
- Special Days - allows you to manage incoming calls received on holidays and/or days away from the office.Each of these sections is described in more detail below.
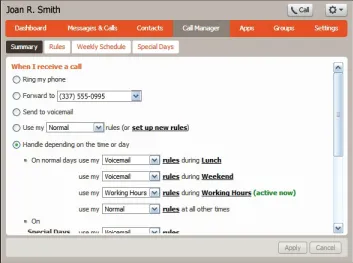
Summary
The ICM Summary page provides you with a single view of how your calls are currently being routed and is the ExecCONNECT interface for changing your ICM forwarding setting. If enabled by your company's administrator, from this page, you can quickly change your forwarding settings by selecting a radio button under the When I Receive a Call section. The Summary tab allows you to view and configure your call-handling options. For example, you may wish for your phone to ring as normal, divert all calls directly to voicemail, or apply some of your call handling rules depending on the time of day. You also have the option to automatically forward calls to a different phone number or send calls to voicemail when your line is busy or when you don't answer your phone.
If you have not yet configured any call handling rules (for example, when you initially access the Call Manager Summary tab) only the first three radio buttons and the additional options shown in Figure 33 are displayed. You will see an introductory message explaining how Call Manager rules work and will be prompted to click on a link that takes you to the Rules tab so that you can configure these. Once you have configured at least one Rule, all five radio buttons will be displayed on the Summary tab. If you have not yet set up a weekly schedule, you will see a message prompting you to do so by clicking on a link that will take you to the Weekly Schedule tab. The schedule-specific sub-settings shown on Figure 34 will be hidden unless the "Handle depending on the time or day" radio button is selected.
Rules-Based Routing
Rules-based routing allows you to control how your calls are routed based on a set of pre-configured rules. Rules-based routing is configured by selecting the Rules tab from the ICM page. If setting up rules for the first time, a short description of rules-based routing is displayed along with a link to Get Started with some Typical Sets of Rules. By selecting this link, three rules will be created: "Normal," "Reject Calls" and "Screen Calls."
Note: When configuring a Rule, users can use wildcard number matching that allows a single call-handling rule to apply to ranges of calling numbers for instance, to all phone numbers within a particular area code. Rather than having to specify multiple numbers, users can use a "?" to match any digit, or a "*" to match any series. For example, 555 123 44?? matches every number from 555 123 4400 to 555 123 4499, while 555∗ matches any calls from phone numbers starting with 555. "*" may only be used as the final character in a pattern and hence may appear once in a pattern, or not at all.
"?" may be used more than once in a pattern, and may appear in any character position within a pattern.
Wildcards can be mixed with Business Group prefixes. These prefixes may start with an asterisk (being a literal asterisk character in the number, not a wildcard) but can then be followed by the wildcard *. Therefore, specifying ** would allow a user to set a rule that applied to incoming calls from all the extensions in a Business Group.
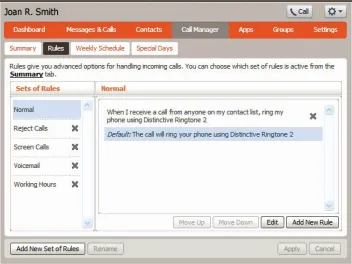
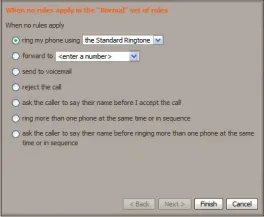
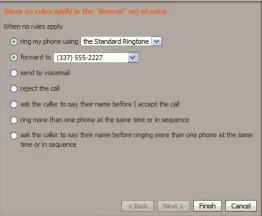
To modify how your "Normal" calls will be handled with no rules defined or when an inbound call does not match a rule, click Normal on the left, and then click on the link contained in the text under the "Normal" rule section. This Set of Rules does not contain any rules for specific callers so when it is active, all calls will ring your phone using the Standard Ringtone. To override this behavior for specific callers, click the Edit button at the bottom right of the screen. From this screen, you can select and configure the following:
- Ring your phone with a standard or distinctive ringtone.
- Forward the call to a designated phone number.
- Send the call to voicemail.
- Inform the caller that you are unavailable and reject the call.
- Prompt the caller to record their name then prompt you to accept or reject the call.
- Ring more than one phone simultaneously or in sequence.
- Prompt the caller to record their name, then ring more than one phone and prompt you to accept or reject the call.
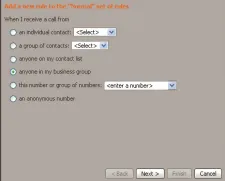
In order to define a new rule for Normal calls, click the Normal call rule and then click the Add New Rule button.
Begin configuring your rule by selecting the caller or callers to which the rule will apply. The options are:
- An individual contact - Apply to individual contact (in your contact directory).
- A group of contacts - Apply to group of contacts as defined in your contact directory.
- Anyone on my contact list - Apply to all callers for which you have a contact defined.
- Anyone in my business group - Apply to all other members of your business with the hosted voice service.
- This phone number or group of numbers - Apply to a specific phone number. Can be any number.
- An anonymous number-Apply to any callers that have restricted their calling number.
Once you have selected the individual or group of callers that this rule will apply to, click the Next button.
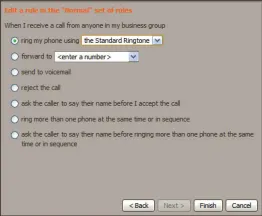
As shown in Figure 39, next you will select how the system will route your calls when you receive a call from this selected contact or group. The available routing options are:
- Ring your phone with a standard or distinctive ringtone.
- Forward the call to a designated phone number.
- Send the call to voicemail.
- Inform the caller that you are unavailable and reject the call.
- Prompt the caller to record their name then prompt you to accept or reject the call.
- Ring more than one phone simultaneously or in sequence.
- Prompt the caller to record their name then, ring more than one phone and prompt you to accept or reject the call.
To have the system route calls to one or more phones (either of the last 2 options in the list above), select the appropriate option, click the Next button and follow these steps:
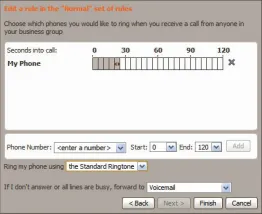
- Add the first phone number to ring by entering the phone number in the Phone Number Field. Remember to enter the number as you would dial it. For example, if you dial 9 to make a call, then enter 9 and the number.
- Enter the Start ring time and End ring time for the phone (one ring cycle is 6 seconds, however for mobile phones, you may have to allow more time depending on the mobile networks post dial delay.)
- Click the Add button.
- Continue to add numbers as defined in steps 1-3 until all numbers have been added.
- If you choose to include your desk phone or "My Phone," you can select your preferred ringtone.
- Select the number to forward calls to in the event the lines are all busy or not answered. Options are voicemail or any dialable number (options may vary).
- Click Finish.
Schedule-Based Routing
The Weekly Schedule functionality of Incoming Call Manager allows you to apply different routing rules based on time of day and day of week. For instance, you may want all calls to ring your desk phone during working hours and ring your mobile phone during lunch or after business hours.
When first configuring your weekly schedule, you will be presented with two options:
- Begin with a blank weekly schedule that you can set up from scratch.
- Begin with a typical weekly schedule that you can fine tune.
For ease of use, select option 2 - Begin with a typical weekly schedule that you can fine tune and follow the steps below:
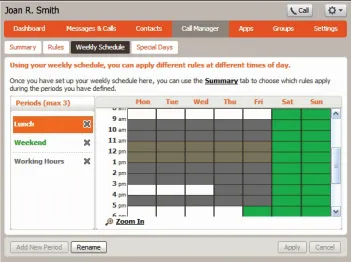
- Select the period that you want to modify from the left side of the screen.
- Click on the day and time you want to change. To change multiple time periods, click and drag across the days and time periods you wish to change.
- To rename a period, click the rename button and enter the new name.
- Click Apply.
Special Days (Holidays)
The Special Days tab allows you to set dates that are exceptions to their normal weekly schedule, for example holidays, vacations or business trips. This screen includes the option to add the public holidays for the region automatically at the click of a button.
To configure Special Days, select the Special Days tab and follow the steps below:
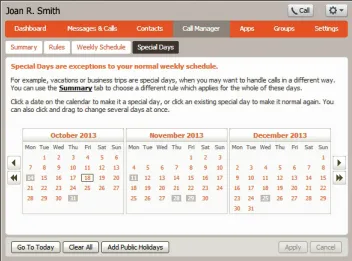
- To select individual Special Days:Select the month using the # button or skip three months using the # button.
- Click on an individual day, or click and drag to select multiple days.
- Click Apply.
To have the system automatically define public holidays:
- Click on the Add Public Holidays button.
- Select the holidays you wish to add (US Public Holidays).
- Click Apply.
Once Special Days have been added, you will need to go to the summary tab to apply a specific rule to the Special Days.
Groups
The Groups page shows you all of the groups that your phone line is in.
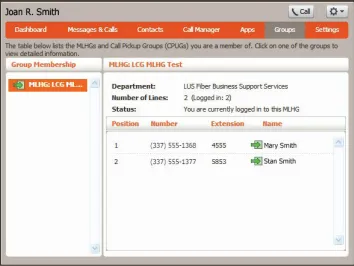
There are two types of groups:
- Multi-Line Hunt Group (MLHG): When a call comes in to a Multi-Line Hunt Group, each line in the group is rung in turn until someone answers the call. Depending on how your administrator has set up your MLHG, you may be able to log in and out of the Multi-Line Hunt Group. When you're logged in, calls to that MLHG will ring your phone. Conversely, when you're logged out, they won't.
- Call Pickup Group: If your phone line is in a Call Pickup Group, then you can pick up calls that are ringing on any other line(s) in that group by picking up your phone and dialing the Group Call Pickup code.
Multi-Line Hunt Groups
Viewing Multi-Line Hunt Groups
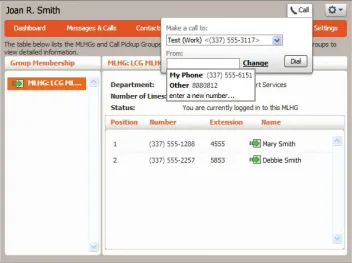
If your phone line is in a Multi-Line Hunt Group (MLHG) then there will be an entry in the Group Membership section for it called MLHG. Click on this entry to view that Multi-Line Hunt Group.
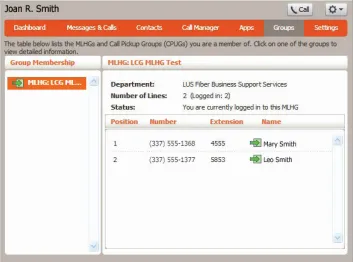
The following information is shown:
- Which department this Multi-Line Hunt Group is in, if any. If your business does not use departments then this will say None.
- The number of lines that are in the group, and how many are logged in.
- Your logged in status.
- All lines that are in this group and whether each line is currently logged in. Your line will be in this list.
Using Multi-Line Hunt Groups
Calls that come into your phone line from a Multi-Line Hunt Group will ring your phone as normal, and you can answer the calls as you usually would. If you have permissions to log in and out of the Multi-Line Hunt Group, you may use ExecCONNECT do so.
Using ExecCONNECT
- To log into the Multi-Line Hunt Group using ExecCONNECT, click on Login. Your line will be marked in the list with.
- To log out of the Multi-Line Hunt Group using ExecCONNECT, click on Logout. Your line will be marked in the list with.
Call Pickup Groups
Viewing Call Pickup Groups
If your phone line is in a Call Pickup Group, then there will be an entry in the Group Membership section called CPUG. Click on this entry to view that Call Pickup Group.
The following information is shown:
- Which department this Call Pickup Group is in, if any. If your business does not use departments, then this will say None.
- The number of lines in this Call Pickup Group.
- All lines that are members of this Call Pickup Group. Your line will be in this list.
Using Call Pickup
To pick up a call that is ringing on another phone in your Call Pickup Group, follow these steps:
- Pick up your phone handset.
- Dial the Call Pickup access code: *11.
Alternatively, if two or more phones are ringing and you want to pick up the call that is ringing on a particular extension number, follow these steps:
- Pick up your phone handset.
- Dial the Directed Pickup access code: *12.
- Dial the extension number on which the call is ringing.
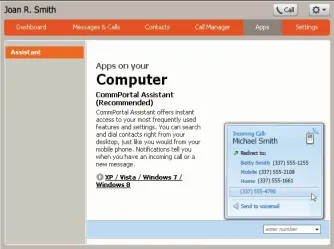
Apps
The Apps page allows you to access various applications to your phone service. At this time, ExecCONNECT Assistant is the only application available for download, but there may be more in the future. Once you get comfortable with ExecCONNECT, it is recommended that you download ExecCONNECT Assistant, a desktop application that offers instant access to your most frequently used features and settings.
Settings
The Settings page consists of a series of tabs allowing you to configure the phone system.
- Account - allows you to see your personal details, change your password and PIN, and configure your phone's keys.
- Calls - allows you to configure your general phone and call forwarding preferences.
- Messages - allows you to configure your voicemail message, Mailbox, and greeting preferences.
- Notifications - allows you to set up preferences for your incoming messages.
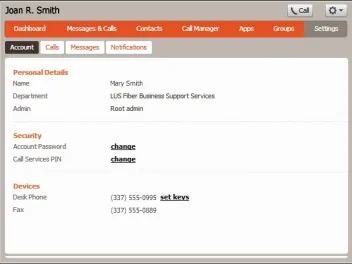
Account
The Account tab lets you set up the security options for your phone account.
Personal Details
The Personal Details shows you information about your line.
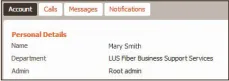
- Name - shows the name for which this line is configured. Your company's designated administrator can change this information if it is incorrect.
- Department - shows whether your line is in a department, and if so, the name of the department. If departments are not used in your business, this will say None.1
- Admin - shows if you are an administrator, and if so, for which department.
Security
In the Security section, you are able to change your ExecCONNECT password and Call Services PIN.
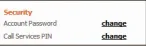
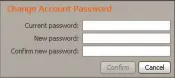
To change your ExecCONNECT password, follow these steps:
- Click on Change next to Account Password.
- Enter current password in Current Password text box.
- Enter your new password in New Password text box.
- Enter your new password again in the Confirm new password text box.
- Click Confirm.
Changing your Call Services PIN
Your Call Services PIN allows you to access Remote Access to Call Forwarding. To change your PIN, follow these steps:
- Click on Change next to the Call Services PIN.
- Enter the new PIN in New PIN text box.
- Click Confirm.

Devices
The Devices section allows you to see all of your ExecCONNECT devices. You can also set up your phone key preferences.
You can configure your phone's keys using the Phone Configurator. To launch the Phone Configurator, follow these steps:
- Select the Settings page in ExecCONNECT.
- Select the Account tab.
- Click on the set keys link.
This launches a new browser window for the Phone Configurator. You must have Adobe Flash Player version 9 or later installed to use the Phone Configurator.
Once you have launched the Phone Configurator you will be presented with an image of your phone.

The examples shown in this document show a Cisco SPA525G phone. Your phone model may differ from the one shown although the functions remain similar. If you have a phone with one or more sidecars, you can zoom in on the phone or a sidecar by hovering your mouse pointer over it. You can see whether you can modify a key by hovering your mouse over the key. If the key glows blue, you can configure it. If it glows red, you cannot.


To select a key, click on it. This will launch a pop-up allowing you to configure the key.
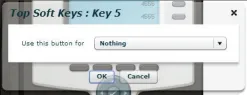
Use the drop-down list to select the operation you'd like that key to perform.

The possible options are as follows (although not all of these options may be enabled on your phone system):
- Nothing - this is used when a key is not assigned a function.
- Line - this key is used for your phone line. Pressing this key will cause the phone to go off-hook and ask you for digits to dial. When calls come into that phone line, this key can be used to answer those calls.
- Speed Dial (or Enhanced Speed Dial) - this configures the key as a speed dial key as described in Section 5.2. Enter the number you want this key to call in the box provided.
- Do Not Disturb - configures the key as a Do Not Disturb key.
- Monitored Extension - allows you to monitor another line.§ Enter the number of the extension you want to monitor in the box provided.
- Other Service - this is reserved for future services.
- Park Call - this is used to park calls.
- Retrieve Parked Call - this is used to retrieve parked calls.
- Automatic Recall - this sets up the key as a speed dial to call the Automatic Recall access code.
- Call List - configures the key to show you recent calls.
- Services - configures the key to provide access to services configured on your phone.
- Voicemail - configures the key as a speed dial to access your Voicemail.
- Last Caller ID Erasure - configures the key as a speed dial to call the access code which clears the network list of your recent calls.
- Automatic Callback - configures the key as a speed dial to call the Automatic Callback service.
- Trace Call-configures the key as a speed dial to call the Call Trace service.
- Line Identity - configures the key as a speed dial to call the Line Identify service, which reads back your phone number.
- Group Pickup - configures the key as a speed dial for the Group Pickup service as described in Section 7.2.
- Directed Pickup - configures the key as a speed dial to pick up calls ringing on a particular line.§ Enter the number of the extension you want to pick up calls for in the box provided.
Whichever option you choose for your key, you may enter a label for the key. If your phone has a display next to the key you configured, this label will be shown on the phone display.

Once you have finished configuring your key click OK. The picture of the phone will be updated with the label(s) you gave your new key assignment(s).

Once you have finished configuring your keys, click Save changes to save your changes or Discard changes to abandon your changes. Your phone will pick up the saved changes overnight. If you want the phone to apply the changes immediately, reboot it by unplugging it and plugging it back in.
Calls
The Calls tab allows you to choose your general Click To Dial, caller ID and call forwarding settings.
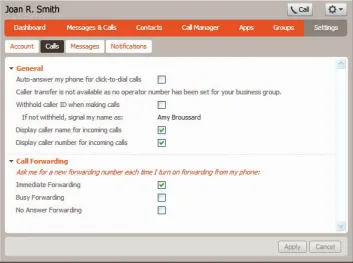
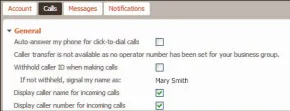
General
The General section lets you change the following settings:
- Auto-answer my phone for Click To Dial calls.
- Withhold caller ID when making calls.§ If not withheld, signal my name.
- Display caller name for incoming calls.
- Display call number for incoming calls.
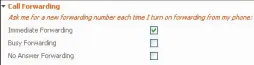
Call Forwarding
The Call Forwarding section lets you configure whether you need to enter a phone number when you dial the Call Forwarding access codes to enable Call Forwarding. If you don't want to enter a phone number, then your Call Forwarding service will use the number you last configured through ExecCONNECT.
To change whether you need to enter a number when enabling Call Forwarding from your handset, follow these steps:
- Check the type of Call Forwarding you want to change to require that a number be entered. To not require that a number be entered, uncheck the type of Call Forwarding you want to change.
- Click Apply.
Messages
The Messages tab lets you view and change some general settings for your phone line which you are unlikely to want to change often.
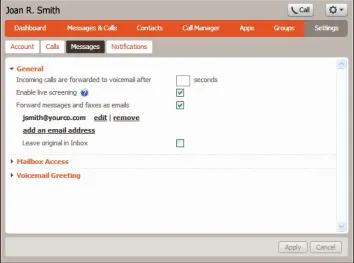
General
The Forwarding Preferences section lets you configure whether you need to enter a phone number when you dial the Call Forwarding access codes to enable Call Forwarding. If you don't want to enter a phone number, then your Call Forwarding service will use the number you last configured through ExecCONNECT.
To change whether you need to enter a number when enabling Call Forwarding from your handset, follow these steps:
- Check the type of Call Forwarding you want to change to require that a number be entered. To not require that a number be entered, uncheck the type of Call Forwarding you want to change.
- Click Apply.
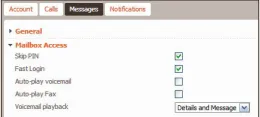
Mailbox Access
The Mailbox Access section lets you change the following settings:
- Skip PIN - allows you to bypass entering your PIN when accessing your voicemail.
- Fast login - allows you to skip entering your PIN and logging into your voicemail faster.
- Auto-play voicemail - automatically start playing new voicemail when logged into the Mailbox.
- Voicemail playback - allows you to choose whether you want to hear just the voicemail messages, just the call details of the voicemail or both.
Voicemail Greeting
The Voicemail Greeting section lets you configure and record voicemail greetings.
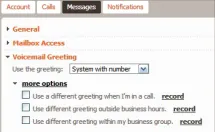
To select the default greeting you desire to play when someone reaches your voicemail, select it from the drop-down list of options. To expand your list of default greetings, you can record greetings through ExecCONNECT (Note: You will need a microphone to record a greeting through ExecCONNECT.) There are three options you can choose to record greetings for:
- Use a different greeting when I'm in a call.
- Use different greeting outside business hours.
- Use different greeting within my business group.To record your own voicemail greeting, follow these steps:
- Click record next to the voicemail greeting option you wish to record.
- Click on the red record button on the left of the popup window to start recording. To stop recording, click on the red stop button to the left.
- Also on this page you can change the volume, Mic settings and Flash settings.
- Click save to finish and to save that recording.
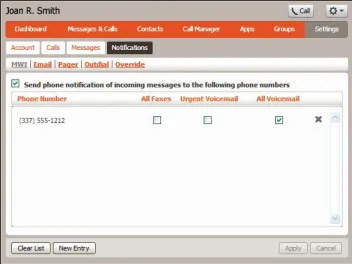
Notifications
The bar under Notifications shows the tabs for the different notification options available.
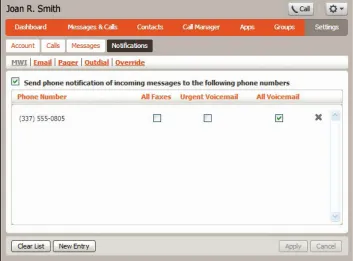
- MWI (Message Waiting Indicator) - allows you to configure whether your phone notifies you when you have messages waiting.
- Email - allows you to configure whether you are alerted via email when messages arrive.
- Pager- allows you to send notifications of incoming messages to a pager according to schedule settings that you define.
- Outdial - allows you to send outdial notification of incoming messages according to schedule settings that you define.
- Override - allows you to define the notification behavior and schedule that, when selected, will override all the other notification settings that you have configured.
Message Waiting Indicator (MWI) notification
You can use the MWI notification section to configure whether your phone should indicate when you have new messages.
To have all new voice messages, urgent new voice messages, and/or all new faxes light your phone's messages light, follow these steps:
- Check All Faxes, Urgent Voicemail, and/or All Voicemail.
- Click Apply.
To add a new phone number, select New Entry to add it. Follow the same steps described above for all of your phone numbers.
To delete a phone number from your list, click on the Delete icon (x) to the right of the phone number or click Clear List to delete all of them.
Email notification
Email notification lets you notify different email accounts when different sorts of messages are waiting. This will override any settings you have in the Settings section, described in Section 9.3.1.
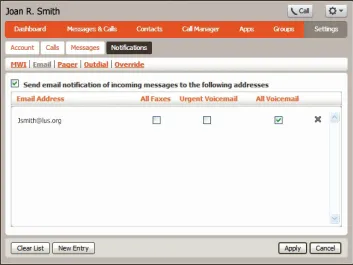
To add an email address to be notified, follow these steps:
- Click New Entry.
- Enter the email address.
- Click Add.
- Check whether you want a notification for All Faxes, Urgent Voicemail, and/or All Voicemail sent to this email address.
- Click Apply.
To delete an email address from this list, follow these steps:
- Click the Delete icon (x) to the right of the email address.
- Click Apply.
To delete all email addresses from this list, follow these steps:
- Click Clear List.
- Click Apply.
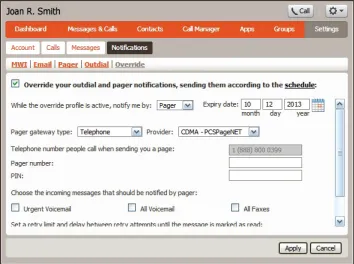
Pager
The pager section allows you to send notifications of incoming messages to a pager according to the schedule settings that you define.
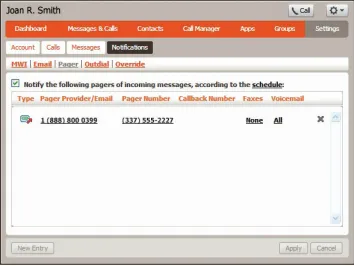
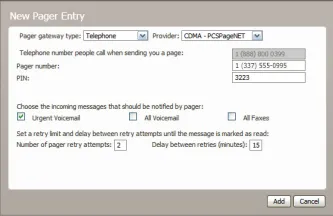
To add a pager to be notified, follow these steps:
- Click New Entry.
- Select the pager gateway type and provider.
- Enter the pager's number and the PIN.
- Check whether you want notifications for All Faxes, Urgent Voicemail, and/or All Voicemail sent to this pager.
- You can also set a retry limit and delay between retry attempts until the message is marked as read.
- Click Add.
To delete a pager from this list, follow these steps:
- Click the Delete icon (x) to the right of the pager number.
- Click Apply.
Outdial
The Outdial section allows you to send outdial notification of incoming messages according to the schedule settings that you define.

To set outdial notifications, follow these steps:
- Select to send outdial notifications of incoming messages, according to the schedule.
- To configure the schedule for outdial notifications, click the schedule link. Here you can edit and customize a schedule, or quickly switch to an empty schedule or office hours only.
- Enter the phone number you want the notifications to go to.
- Check whether you want an additional notification for All Faxes, Urgent Voicemail, and/or All Voicemail.
- You can also set a retry limit and delay between retry attempts until the message is marked as read. You can also choose to stop retries when you answer the call or only when you access your voicemail.
- Click apply.
To cancel outdial notifications, unselect the send outdial notifications of incoming messages, according to the schedule option.
Override
The Override section allows you to define the notification behavior and schedule that, when selected, will override all the other notification settings that you have configured.
Click To Dial
You can make a phone call from within ExecCONNECT by clicking on the Call button at the top right of the screen. This pops up a window in which you can enter the number you want to dial.
Calling From Your Regular Phone
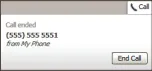
To make a call from your regular desk phone, enter the phone number you want to call in the space provided and click Dial. Your desk phone will now ring; you must answer it in order for the selected phone number to be dialed.
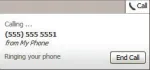
Once the person you called has answered this will be displayed on your screen:
Calling From Another Number
Click To Dial also allows you to make calls from any phone with a direct dial number, so that they appear to come from your business line. This could be your cell phone, a pay phone, or your home phone.
To make a call from another number, follow these steps:
- Enter the phone number you want to call in the space provided or choose an existing contact in the drop down menu.
- Choose one of the existing numbers in the From drop down menu or enter another number you wish to call from.
- Click Dial.
The number you selected to call “From” will now ring; you must answer it in order for the selected phone number to be dialed.
Access Codes
This section lists your phone system’s most commonly used access codes. Please note that features you set in ExecCONNECT or by using star access codes take priority over any similar features that you activate on your actual phone. If you set features through ExecCONNECT or star access codes, you will have no indication of them on your phone.
- Table 1: Access codes
Get dial tone from your phone, and then dial…
Group Call Pickup
*11
Automatic Recall
*69
Dial *69, then wait to hear the last incoming number and the time it was received.
Immediate Call Forwarding Activation
*72
Dial *72 + 9 (if required) + 7-10 digit phone number, then wait for a series of beeps. Your phone will then call the number that you entered and you must answer it for the Immediate CF to be activated.
OR
Dial *72 + 9 (if required) + 7-10 digit phone number TWICE in a row without having to wait for the number to be dialed and answered.
Immediate Call Forwarding Deactivation
*73
Busy Call Forwarding Activation
*90
Dial *90 + 9 (if required) + 7-10 digit phone number, then wait for a series of beeps. Your phone will then call the number that you entered and you must answer it for the Busy CF to be activated.
OR
Dial *90 + 9 (if required) + 7-10 digit phone number TWICE in a row without having to wait for the number to be dialed and answered.
Busy Call Forwarding Deactivation
*91
No Answer Call Forwarding Activation
*92
Dial *92 + 9 (if required) + 7-10 digit phone number, then wait for a series of beeps. Your phone will then call the number that you entered and you must answer it for the Busy CF to be activated.
OR
Dial *92 + 9 (if required) + 7-10 digit phone number TWICE in a row without having to wait for the number to be dialed and answered.
No Answer Call Forwarding Deactivation
*93
Park Call
*94
When you are on a call, select Transfer/Trnsfer/xfer (this varies by phone model) on your phone followed by *94 then wait for the phone to tell you where the call is parked. Complete the transfer when instructed by hitting Transfer/Trnsfer/xfer again.
Retrieve Parked Call
*95
From another phone, dial *95 + the code that was given when you parked the call: example 9520. The call should now be live.
Do Not Disturb Activation
*78
Dial *78, then wait to hear, “Your Do Not Disturb service is now on.”
Do Not Disturb Deactivation
*79
Dial *79, then wait to hear, “Your Do Not Disturb service is now off.”
Voicemail
*98
Dial *98 to access your voicemail.
Follow the instructions as usual.