Welcome To Television Reinvented.
Your guide to broadband for business video and room-to-room DVR Powered by Microsoft Mediaroom
Watch What 100% Fiber Optic Video Can Do For Your Business.
Welcome to Video service from LFT Fiber, powered by Microsoft Mediaroom. With the easy-to-read programming guide and easy-to-use menu and navigation screens, watching TV just got a lot more entertaining. Every LFT Fiber Digital Receiver is HD ready so you can enjoy the clearest picture and the brightest colors with your HD television. With our big-pipe bandwidth you'll enjoy a true 1080i signal. And, with Room-to-Room DVR you can pause, rewind and play live TV. You can even record up to three programs at one time!
Keys To Controlling Your LFT Fiber Video Service
Get To Know Your LFT Fiber HD And HD/DVR Receiver
LFT Fiber supports two types of HD Receivers, the Motorola VIP1200 and the Cisco CIS330; and two types of Room-to-Room DVR Receivers, the Motorola VIP1216 and the Cisco CIS430. The receivers must be handled much in the same way as a computer to reduce potential for damage. Position it in an open space to allow airflow around the box. Do not place the box in an enclosed entertainment unit or cabinet. Do not place the box on a soft surface such as a rug, sofa, bed or other similar surface. The Digital Receiver should not be next to an external heat source that could raise the temperature of the box. Connection into a surge protector along with your other audio/video equipment is highly recommended.

Front Panel Moto VIP1216
The Moto VIP1200 and the Moto VIP1216 have identical front-panel controls and lights only the size varies.
- Power - Powers on and off the Digital Receiver. When held for more than 5 seconds the Digital Receiver is restarted. Green light indicates that the power is on.
- USB Port - Not supported at this time, reserved for future use.
- Link LED-Green light indicates data or programming stream is being received.
- HD LED - Blue light indicates the Digital Receiver is in high definition (HD) mode (720p or 1080i).
- Record - Red light indicates program recording. "NOTE: This feature is used with Room-to-Room DVR service only."
- Menu-Activates the on-screen menu.
- Directional Keys - Allows you to change channels and navigate through the guide and menu.
- OK-Confirms channels or menu options.
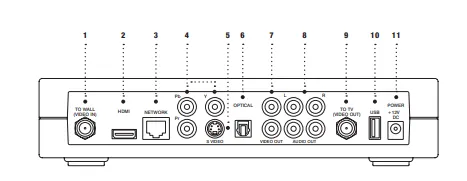
Rear Panel Moto VIP 1216
The Moto VIP1200 and the Moto VIP1216 have identical rear-panel controls and lights, only the size varies.
- To Wall (Video In) - Coax input for your office video network.
- HDMI-Input for high definition TV or video theater receiver with HDMI connections. (Note: LFT Fiber does not support HDMI connections).
- Network - Ethernet port.
- Y PB PR-components to connect video output to an HDTV.
- S-Video-Video output for VCR or TV with S-Video connections.
- Optical S/PDIF audio output to a digital video theater receiver.
- Video Out-RCA output to connect to TV, VCR, DVD recorder or other device.
- Audio Out L and R - Left and Right RCA stereo audio output.
- To TV (Video Out) - Coax output for TV or VCR.
- USB-not currently supported, reserved for future use.
- Power +12V DC-DC power adaptor connection.

Front Panel Cisco CIS430
The Cisco CIS330 and the Cisco CIS430 have identical front-panel controls and lights; only the size varies.
- Power - Powers on and off the Digital Receiver. When held for more than 5 seconds the digital receiver is restarted. Green light indicates that the power is on.
- Link LED - Green light indicates data or programming stream is being received.
- HD LED-Blue light indicates the Digital Receiver is in high definition (HD) mode (720p or 1080i).
- Record - Red light indicates program recording. "NOTE: This feature is used with Room-to-Room DVR service only."
- Menu - Activates the on-screen menu.
- Directional Keys - Allows you to change channels and navigate through the guide and menu.
- OK-Confirms channels or menu options.
- USB Port - Not supported at this time, reserved for future use.
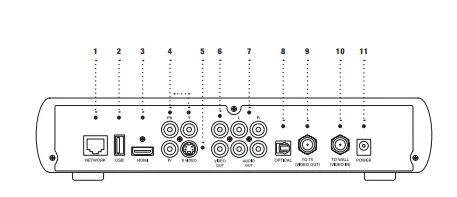
Rear Panel Cisco CIS430
The Cisco CIS330 and the Cisco CIS430 have identical rear-panel controls and lights, only the size varies.
- Network - Ethernet port.
- USB-not currently supported, reserved for future use.
- HDMI-Input for high definition TV or video theater receiver with HDMI connections. (Note: LFT Fiber does not support HDMI connections).
- Y PB PR-components to connect video output to an HDTV.
- S-Video-Video output for VCR or TV with S-Video connections.
- Video Out-RCA output to connect to TV, VCR, DVD recorder or other device.
- Audio Out L and R-Left and Right RCA stereo audio output.
- Optical S/PDIF audio output to a digital video theater receiver.
- To TV (Video Out) Coax output for TV or VCR.
- To Wall (Video In) - Coax input for your office video network.
- Power - power adaptor connection.
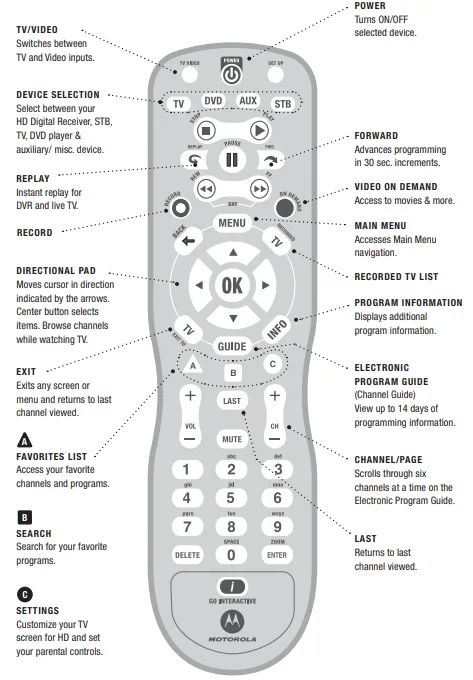
Control Up To Four Devices With Your Remote
At the time of your installation your remote was programmed to control your TV and Digital Receiver. Your remote can also control up to two other devices like a DVD player, stereo receiver or video theater system.
Assign Devices To The Mode Buttons
- Turn on the device you would like to program into your remote.
- Aim the remote at the device, and press and hold the mode button you want to assign it to.
- Press while holding the mode button, and then release them both. All mode buttons will flash twice.
- Enter 9 2 2 within 10 seconds using the number keypad on the remote. The mode button you previously selected will flash.
- Press PLAY if the device is a TV or DVD player. Then press FF repeatedly until the device turns off.
- Press PLAY if you are setting up the button. Then use the number keypad to enter one of the following:1 for VCR2 for stereo receiver/tuner3 for amplifier4 for video theater in a box
- Press to save the settings.
- Press the device's mode button, and then press POWER. The device should turn on. Refer to the remote's manual if it does not.
- Repeat for any other devices. Now you can operate multiple devices with one remote by using your mode buttons.
Control The Volume
At the time of your installation your remote was programmed to control your LFT Fiber Digital Receiver and your TV. This includes the VOLUME+ and buttons. To assign the volume controls to any other device follow the instructions below.
- Press and hold the button. Press while holding the button then release both. All mode buttons will flash twice.
- Enter 9 5 5 on the number keypad. The button will flash twice.
- Press the mode button for DVD or AUX if you would like to send the volume control to a device assigned to one of those buttons. The mode button will flash three times.
- If you want VOLUME+ and to control all devices depending on the active mode Press OK. The button will flash three times.
Control Channel Selection
Channel control buttons like and are programmed to affect your Digital Receiver. If you would like to assign channel controls to any or all of the devices assigned to your remote, follow the instructions below.
- Press and hold the button. Press while holding the button then release both. All mode buttons will flash twice.
- Enter 9 6 6 on the number keypad. The button will flash twice.
- Press the mode button for or if you would like to send channel controls to a device assigned to one of those buttons. The mode button will flash three times.
- If you want and to control all devices depending on the active mode press. The button will flash three times.
Control Power On Other Devices
At the time of your installation the POWER button on your remote was programmed to affect your Digital Receiver. If you would like to assign the POWER button to other devices, follow the instructions below.
- Press and hold the button. Press while holding the button then release both. All mode buttons will flash twice.
- Enter 9 7 7 on the number keypad. The button will flash twice.
- Press the button, it will flash twice. Press the button, it will also flash twice.
- Press and/or to control those devices, each button will flash twice.
- Press once you are finished adding devices and then the DVD button will flash three times.
Start With The Basics
Turn Your TV On Or Off
To begin your new TV viewing experience, you must first turn on your television set.
- Press the button on your remote control.
- Press the POWER button on your remote control, this will power on your TV and Digital Receiver simultaneously.
- Your install technician programmed your LFT Fiber remote control so that you can control your television set. If you need to reprogram your remote control at any time, visit LFTFIBER.com for a list of television codes or call 99-FIBER (993-4237) and select option 2, 2.
Change The Channel
Your new LFT Fiber Video service offers a great new Instant Channel Change feature. You'll notice immediately how fast you can channel surf in order to find something to watch. The Instant Channel Change feature is ONLY available with LFT Fiber.
- Press + or-on the button to move up or down one channel.
- Press and hold + or - on the button to scroll continuously up or down through channels.
- Enter a specific channel number on the remote keypad to go directly to that channel.
- Press on your remote control to return to the last channel you were watching.
Browse With Picture-In-Picture (PIP)
See what else is playing without leaving your current program. LFT Fiber Video service gives you the ability to flip through current programs and actually see what's on without leaving the program you are watching with convenient Picture-In-Picture (PIP) Browse. PIP Browse is ONLY available with LFT Fiber.
- Press the up or down arrow keys to view current programs on channels above or below the channel you are watching.
- Press the right arrow key to find out what programs are scheduled to play in the future.
- Press at any time for information about the program listed in the PIP Browser.
- Press to change the channel to the one you see in the PIP Browser. (If the program you select is not currently playing, then you will see the PROGRAM INFO screen.)
Access And Navigate The Onscreen Menus
LFT Fiber Video offers you more. The onscreen menus are easy-to-use and a breeze to navigate with your remote control.
- Use the left and right arrow keys to select items on any horizontal menu that appears at the top of any LFT Fiber Video screen.
- Use the up and down arrow keys to select items on any vertical menu that appears when you highlight an item in the top menu navigation.
- Press to select your highlighted item.
- Press BACK to go back to the last menu screen you were viewing.
- Press or EXIT TO at anytime to return to TV viewing.
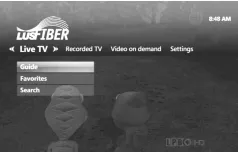
The Menu Button
The button on your remote control will give you access to all of the great features your LFT Fiber Video service has to offer including enhanced search, channel favorites, parental controls, Video on Demand and more. Note: Step-by-step instructions on all of the features listed in this section can be found throughout this guide.
- Press on your remote control. The MAIN MENU screen appears.
- Use the left and right arrow keys to select a heading in the MAIN MENU.
- Select LIVE TV to access the guide, your favorite channels or the enhanced search feature. See pages 14-16 for more information.
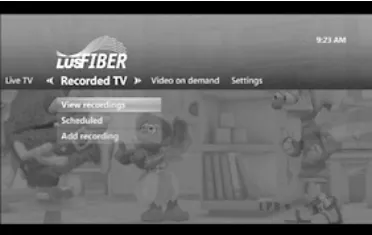
- Select RECORDED TV to access all programs you have recorded with your Room-to-Room DVR service. See page 23 for more information.
- Select VIDEO ON DEMAND to access the Video on Demand Free Connection, new releases or to access movies that you have already rented. See page 21 for more information.
- Select EXTRAS to access LFT Fiber Applications on Demand.
- Select SETTINGS to customize your program guide, manage your parental controls, set the viewing aspect ratio for your TV and more. See pages 12-18 for more information.
- Use the down arrow key to select any of the options on the drop-down menus that appear under your selected menu heading.
- Press to open selected screens.
The Info Button
The button gives you more information about current and future programming. Press this button anytime you would like more information on a selected program. You can also schedule a recording from any PROGRAM INFO screen.
Get Info About The Program You're Watching
- Press the button on your remote. The PROGRAM INFO screen appears with a brief description of the program including the run time.
- Press the right arrow key to access information on the cast and crew.
- Press the down arrow key to record the program one time or to set up a series recording. Press to select the desired action. See page 24 for more information.
- Press or EXIT TO to return to the program you were watching.
Get Info About A Future Program
- Press GUIDE on your remote. See page 14 for more information.
- Press the right arrow key to highlight a program that is not currently on.
- Press to view details about the highlighted program and to schedule a one-time or series recording.
Note: You can also get more information on any program in your results list when using the search feature.
Customize Your TV Screen For HD
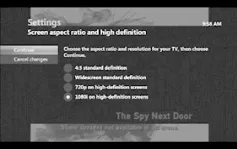
Change Your Screen Aspect Ratio For Widescreen Or HDTV
Aspect ratio is the relationship of the screen's width to its depth. Standard TVs have a 4:3 aspect ratio; widescreen and HDTVs have a 16:9 ratio.
- Press.
- Press the right arrow key to navigate to the SETTINGS menu. Use the down arrow key to select Television and press .
- Press the down arrow key to select the Screen Aspect Ratio and High Definition screen and press OK.
- Use the up and down arrow keys to select from:
- 4:3 standard definition
- Widescreen standard definition
- 720p high definition or 1080i high definition, depending on your TV
- Press. The system may ask to run a test to ensure that your desired setting is applied to your TV. Use the arrow keys to continue and press again.
Use Zoom To Adjust The Aspect Ratio
This feature will allow you to easily adjust the aspect ratio on your TV. In order to activate the Zoom feature, set your aspect ratio to 720p or 1080i. If you watch non-HD (standard definition) programming in widescreen mode on a widescreen HDTV, black bars will appear on the sides of the program. To remove or minimize the bars, follow the steps below using the remote.
- Press to access the viewing options menu.
- Use the down arrow key to select aspect ration and press 3.
- Use the down arrow key to select your desired setting.
- Normal: displays the normal image.
- Zoom 1 to 3: increase the zoom.
- Stretch: expands the image to fill the screen (may cause distortion of picture).
- Press to save your selection. Zoom will affect all channels, not just the one you've changed the setting on.
Note: Some movies will still have black borders above and below the image, even on a 16:9 HDTV. Movies appearing this way are filmed with an aspect ratio of 21:9. These movies are called Cinemascope movies.
Find What You Want To Watch And Choose Favorites
LFT Fiber Video service offers you several ways to find what you want to watch so that you never miss a program. You can even create a Program Guide with just your favorite channels so you only see the channels you are interested in.
Use The Interactive Program Guide
- Press the CURE button to display the Interactive Program Guide.
- Use the Arrow Keys to scroll through current and future programming options.
- Use to scroll through a page at a time.
- Use FF/REW to skip ahead / back 24 hours at a time. Your LFT Fiber Interactive Program Guide will allow you to view programming information up to 14 days in the future.
- Highlight a program to view more information .
- Press ok to view the program if it is currently on. If your selected program is not currently on, then a PROGRAM INFO screen will appear .
- Press to see more viewing options and additional program information like cast and crew .
- Press the RECORD button once to record the program. Press the RECORD button twice to record the series. See page 24 for more information on recording.
- Press CUIDE to exit the Interactive Program Guide and resume your viewing.
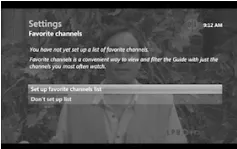
Set Up Your Favorites List For The First Time
- Press to access the MAIN MENU screen. Select LIVE TV, and then use the down arrow key to highlight FAVORITES, and then press Ok.
- Select SET UP FAVORITES list and press C. A list of available channels will appear onscreen.
- Use the up and down arrow keys to select your favorite channels.
- To add a channel to your list, press 3. A check mark will appear to identify the channel you selected. Press ck again to remove the check mark or to deselect the channel.
- To remove all selected channels, use the left arrow key to highlight UNCHECK ALL and press.
- To see only the channels you have selected for your favorites list, select VIEW ALL and press .
- Select SAVE and press k once you are finished selecting all of your favorite channels.
- Press on your remote to view your customized favorites guide. Select LIVE TV, then FAVORITES and press or press A on your remote control for quick access to your favorites list.
Edit Your Favorites List
Once your FAVORITES list is set up, follow the steps below to add or remove a channel.
- Press the button.
- Use the right arrow key to navigate to SETTINGS. Press.
- Use the down arrow key to select TELEVISION. Press .
- Use the down arrow key to navigate to SET UP FAVORITES. Press OK.
- Use the up and down arrow keys to select or deselect the channels you would like to appear on your FAVORITES list.
- Select SAVE and press once you are finished editing your FAVORITES list.
Find Programs Using Search
- Press on your remote. Select LIVE TV, then SEARCH and Press.
- Use the Arrow Keys to select a letter on the onscreen keyboard and press . Continue until you have entered your search term.
Note: To enter a number, select the 123 button and Press. This will bring up a number keypad. Select the ABC button and Press to return to the regular keyboard.
- The results of your search will appear as you type. The more letters you type, the more defined your results will be.
- Use the right arrow key to navigate to your results list.
- Use the Arrow Keys to select a title or name. Press to view options.
- If you select a title, you can choose to watch it if it is currently on or record it if it is scheduled to play in the future.
- If you select a name, you will see a list of programs with that actor or director. Select a title and press to view or record that program. Continued
- If MORE... appears next to a title, select it to see a list of all programs with that title. Select an episode and press to view or record that program.
- If VIDEO appears next to a title, you can preview or rent the program through the VIDEO ON DEMAND feature.
Narrow Your Search
- Navigate to the SEARCH screen. Select OPTIONS on the onscreen keyboard and press OK.
- Under FILTER RESULTS, select TITLES, VIDEO ON DEMAND or PEOPLE depending on what you are looking for. Press.
- Use the onscreen keyboard to enter your search term. Results will appear as you type. Select from the RESULTS list and press C.
Control The Keys To Parental Locks
With LFT Fiber Video service you can control what types of programs can be viewed in your business. You can even hide unwanted information that may appear in the program guide. Use parental locks to make certain channels and types of programming are only accessible with a Personal Identification Number (PIN).
- Press. Use the right arrow key to select SETTINGS and the down arrow key to highlight PARENTAL CONTROLS. Press.
- If a lock appears next to PARENTAL LOCKING, then a PIN has already been set and parental locks are in place.
- If an open lock appears next to PARENTAL LOCKING, then a PIN has been set but no parental locks are in place.
- If no lock appears, then a PIN has not yet been set.
- Press ok to select PARENTAL LOCKING.
- Use your remote to enter your current four-digit PIN. If no PIN has been set, enter your desired four-digit PIN. You will be prompted to enter it again for confirmation.
- Use the Arrow Keys to navigate the locking options that appear on the PARENTAL LOCKING screen.
Lock Specific Channels
- From the PARENTAL LOCKING screen use the Arrow Keys to select CHANGE next to CHANNELS. Press OK.
- Use the up and down arrow keys to select specific channels from the onscreen list. For faster navigation use the button. This will scroll up or down a page at a time. Press to lock a channel. A lock will appear.
- Press again to unlock the channel.
- To unlock all channels, use the left arrow key to select UNLOCK ALL and press.
- To see only the channels you locked, use the left arrow key to select VIEW LOCKED ONLY and press Ok.
- Select SAVE and press.
- Select LOCK. Press and then or EXIT TO on your remote.
Lock Programs Based On Ratings
- From the PARENTAL LOCKING Screen, use the Arrow Keys to select CHANGE next to USE TV PARENTAL GUIDELINES or MOVIE RATINGS depending on the rating system you would like to lock. Press OK.
- Use the down arrow key to select the lowest rating you would like to lock, press OK.
- This will lock all TV programs or movies (depending on the rating system you selected) with that rating or higher.
- To unlock all ratings, use the left arrow key to select UNLOCK ALL and press.
- Select SAVE and press .
- Select LOCK. Press and then or EXIT TO on your remote.

Lock Video On Demand Rentals
- From the PARENTAL LOCKING Screen, use the Arrow Keys to select CHANGE next to RENTALS. Press.
- Select LOCK RENTING and press . A lock will appear. This will require your four-digit PIN before a VIDEO ON DEMAND rental can be made.
- Select SAVE and press OK.
- Select LOCK. Press and then or EXIT TO on your remote.
Turn Off Locks Temporarily
- From the PARENTAL LOCKING Screen, use the Arrow Keys to select TURN OFF LOCKING. Press.
- Select UNLOCK ALL TV FOR 4 HOURS and press ok.
Note: A PIN will still be required to purchase locked rentals.Continued
- If you would like to turn locks on before the allotted time period, select LOCK on the PARENTAL LOCKING screen and press OK.
Reset All Your Parental Locks And Pin
- From the PARENTAL LOCKING Screen, use the Arrow Keys to select TURN OFF LOCKING. Press OK.
- Select RESET ALL PARENTAL LOCKS and press.
- Select RESET to reset your PIN and to stop using parental locks. Press O. The next time you access the PARENTAL LOCKS screen you will be asked to create a new PIN.
Hide Channels In The Guide
You can customize your channel guide by choosing to hide specific channels. Hidden channels will not appear in the program guide or while Browse. You can still access hidden channels by using the keypad on your remote.
- Press. Use the right arrow key to select SETTINGS and the down arrow key to highlight TELEVISION. Press .
- Select CUSTOMIZE CHANNEL GUIDE and Press Ok.
- Use the up and down arrow keys to select channels (or use the button to scroll through a page at a time). Press to hide a channel. The check mark will disappear. This channel is now hidden. Press again to unhide the channel (the check mark will reappear).
- To recheck all channels, use the left arrow key to select CHECK ALL. Press.
- To see only the channels you selected to hide, highlight VIEW UNCHECKED and press GK.
- Select SAVE and press O.
Pause, Play, Replay And Record Live TV
If you subscribe to LFT Fiber's Room-to-Room DVR service, you can control live TV! Your Room-to-Room DVR records up to 90 minutes of the channel you are currently watching. This means you can pause, replay and record what you're watching so that you never miss a thing.
Pause Or Restart A Program
- Press PAUSE on your remote to temporarily stop a live TV program.
- A progress bar will appear onscreen. This will show you the start and end times of your current program, how much time has elapsed and at what point you paused the program. The program will remain paused for up to 90 minutes. If you cannot return to your program in 90 minutes, simply press RECORD so that you can resume viewing when you are ready.
- Press PLAY at any time to resume viewing.

Replay Part Or All Of A Program
- Press REW to rewind the program you are currently watching.
- A progress bar will appear onscreen. This will show you the start and end times of your current program and will indicate how far you can go back in time.
- Press REW up to three times to rewind at increasing speeds.
- Press REPLAY to skip back in 7-second increments.
- Press PLAY anytime to resume viewing.
Fast Forward Or Return To The Program
If you have paused, replayed or used the rewind feature while watching live TV, you can use the FF and FWD buttons on your remote to go forward in time.
- Press FF to fast-forward through your program.
- A progress bar will appear onscreen. This will show you the start and end times of your current program and will indicate how far you can go forward in time.
- Press FF up to three times to advance at increasing speeds.
- Press FWD to fast-forward in 30-second increments.
- Press FF or FWD until you reach the end of the green bar in the progress indicator to return to live viewing.
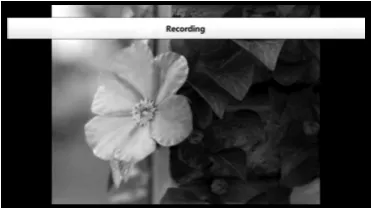
Record The Program You're Watching
- Press RECORD to begin recording the program you are watching. The recording feature is not available with VIDEO ON DEMAND OF PAY PER VIEW.
- A RECORDING message will appear onscreen and the record LED will light up red on the front of your HD or HD/DVR Digital Receiver to indicate that it is in record mode.
- Press STOP to end the recording at any time and then press . If you do not manually stop the recording it will automatically stop at the program's scheduled end time.
Note: Your Room-to-Room DVR gives you the ability to watch or record up to three programs at the same time whether they are standard definition or high definition.
- Once your recording is complete it will be saved under the program's title. See page 28 for more information about playing recorded programming.
Add Extra Recording Time To The End Of The Program
If you think that the program you are recording will go over its scheduled end time, you can add time to the end of the recording. This happens often with sporting events and season finales.
- Press after the program has begun recording. Use the Arrow Keys to select RECORD OPTIONS and press.
- Select STOP RECORDING and press ok.
- Select the amount of time you would like to add to your recording. Press.
- Use the left arrow key to select SAVE CHANGES and press.
- Select WATCH and press . This will return you to your program.
Discover, Preview And Enjoy Your Choices With Video On Demand
With LFT Fiber Video service you can rent new releases and your old favorites using Video on Demand. Rent movies with the touch of a button and watch them when you want. Any rental charges will be added directly to your monthly bill.
Rent Movies From Video On Demand
- Access the VIDEO ON DEMAND menu screen by performing one of the actions listed below.
- Press VIDEO ON DEMAND on your remote.
- Press. Use the Arrow Keys to select VIDEO ON DEMAND. Highlight BROWSE VIDEOS and press .
- Use the right arrow key to select movies and press.
- Use the down arrow key to browse categories like NEW RELEASES and COMEDY. Or to search for a particular movie or actor, press. Use the Arrow Keys to select VIDEO ON DEMAND, then highlight SEARCH and press .
- Use the down arrow key to select from the onscreen results list. Select a title or actor and press OK.
- A PROGRAM INFO screen appears with information about that movie or program including a summary of the video, price and the rental period.
- Use the down arrow key to select WATCH PREVIEW to see a preview of your selection. Press Ok.
- Use the right arrow key to to view the PEOPLE SEARCH screen. A list of actors that star in the selected video will appear onscreen along with additional information if available.
- Press BACK to leave this screen and return to the previous screen without renting.
- Select RENT and press . Press to confirm your rental and your video will begin.Note: If you have set up your parental locks, you may be asked to enter your PIN before the purchase is complete.
- Select STOP at any time before your video ends to stop watching and continue watching later. Select DONE and press.
- Press or EXIT TO on your remote.

Play Your Current Video Rentals
You can access your rentals as often as you like within the specified rental period.
- Press and scroll to VIDEO ON DEMAND. Press ok.
- Use the right arrow key to select CURRENT RENTALS and press.
- Use the down arrow key to select the current rental you want to watch. Press OK.
- You can choose to start watching the video where you left off or from the beginning.
Order Pay Per View Events
Some Pay Per View sporting events like WWE, UFC and others require businesses to gain permission directly from the content provider before LFT Fiber can deliver the signal. For more information, please call 99-FIBER (993-4237) and select option 2,1.
Paying For On Demand Rentals And Pay Per View Events
Any orders you place onscreen are automatically added to your monthly bill. You will find them in the Usage Charges section. They will be listed by title with date rented and rental cost.
Your LFT Fiber Room-To-Room DVR Has It All
Your LFT Fiber Room-to-Room DVR gives you multiple advanced recording features like recording 3 programs at once and watch recorded content from any Digital Receiver in the office! You've already learned how to use your remote to control live TV... another feature of your LFT Fiber Room-to-Room DVR. In this section you will learn how to schedule, manage and view a recorded program or series.
Schedule Programs For Recording
There are multiple ways you can record a program that is scheduled to air in the future. You can also set your Room-to-Room DVR to record one show one time, all episodes of a series and more.
Schedule A Single Or Series Recording From The Program Guide
- Press QUIDE. Use the Arrow Keys to scroll through the available content and highlight a program.
- Press RECORD. A single red dot appears next to the program listing in the guide to indicate that a recording is scheduled.
- Press RECORD twice to schedule a recording of the same program at the same day and time every week. Three red dots appear next to the program listing in the guide to indicate that a series recording is scheduled.
- Press RECORD a third time to cancel the recording. All red dots will disappear.
- Press or EXIT TO to resume watching normal programming.
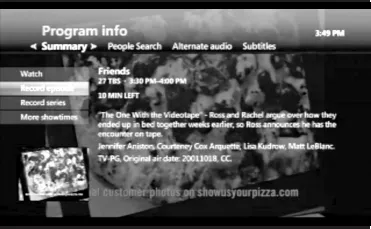
Schedule A Single Recording From The Program Info Screen
- Access the PROGRAM INFO screen using one of the following actions:
- Press while watching a program you want to record.
- Press GUIDE. Use the Arrow Keys to highlight a program to record and press.
- Select RECORD EPISODE and press .
- If you would like to add time to a program that is currently being recorded (in case you think it might run long), select then the down arrow key to select RECORD OPTIONS. Select STOP RECORDING and press.
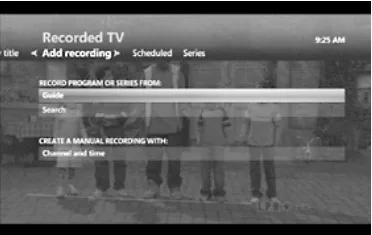
Schedule A Single Recording By Channel, Time And Date
- Press RECORDED TV on your remote. Or you can press, and use the right arrow key to select RECORDED TV.
- Use the Arrow Keys to navigate to ADD RECORDING.
- Select CHANNEL AND TIME and press. The MANUAL RECORD screen will then appear.
- Use the Arrow Keys to fill in the fields on the MANUAL RECORD screen.You can elect to keep the recorded program until you delete it or you can allow your Room-to-Room DVR to delete it when it is time to make room for new recordings.
- Select RECORD and press to schedule the recording.
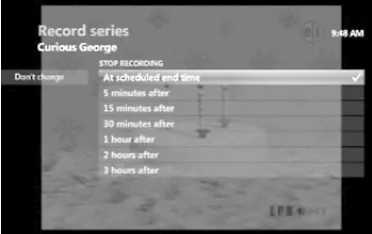
Schedule A Series Recording From The Program Info Screen
- Access the PROGRAM INFO screen using one of the following actions:
- Press while watching a program you want to record.
- Press GUE. Use the Arrow Keys to highlight a program to record and press.
- Select RECORD SERIES and press ok.
- Use the Arrow Keys to select the time and press ok.
- Select from the following options to limit your recordings:
- Any day (at the same time)
- Any day/anytime
- Any day/anytime/once per day
- If you want to limit your series recording to first run only episodes, select FIRST RUN ONLY under SHOW TYPE. The default setting is to record every instance.
- If you think that the episodes may run long, add extra time to the end of the program by selecting STOP RECORDING. Press and select a time.
Note: Your LFT Fiber Whole Home DVR will not adjust if a program's schedule changes unexpectedly. However, planned schedule changes, such as a series moving from 7:00pm to 7:30pm for one week, will be detected by your DVR and the episode will be recorded in its entirety.
- If you would like to limit the number of episodes your room-to-room DVR saves, select KEEP and press. Choose to keep all episodes until you manually erase them or choose to keep a specified number of episodes. The default setting is to keep all episodes until space is needed. Unless you change this setting your room-to-room DVR will erase episodes as space is needed beginning with the oldest episode first.
Schedule A Single Recording By Channel, Time And Date
- Press RECORDED TV on your remote. Or you can press , and use the right arrow key to select RECORDED TV .
- Use the Arrow Keys to navigate to Add recording.
- Select Channel and time and press . The Manual record screen will then appear.
- Use the Arrow Keys to fill in the fields on the Manual record screen.
- You can elect to keep the recorded program until you delete it or you can allow your Room-to-Room DVR to delete it when it is time to make room for new recordings.
- Select Record and press to schedule the recording.
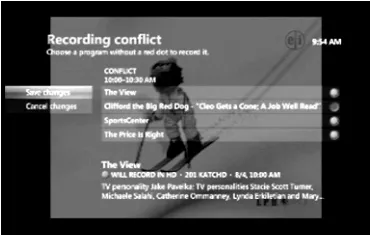
Solve Conflicts In Recording Schedules
Your LFT Fiber Room-to-Room DVR can record up to 3 programs at the same time. If you try to record a fourth program, a RECORDING CONFLICT screen will appear.
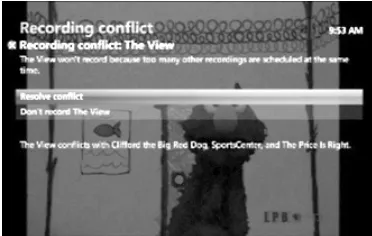
Solve Single Program Conflicts
- To record the new program, select it from the menu on the RECORDING CONFLICT screen and press o.
- To keep what was already scheduled and cancel the new recording, select the previously scheduled program and press Ok.
Solve Series Conflicts
- To record all episodes of the new series instead of a previously scheduled series, select RECORD ALL EPISODES OF NEW SERIES from the RECORDING CONFLICT screen and press.
- If you don't want to record episodes that conflict with your previously scheduled recordings, select RECORD ONLY WHEN NO CONFLICT OCCURS and press OK.
Record An Overridden Program
- Press GUIDE. Use the Arrow Keys to navigate to the program that has been overridden (indicated in the guide by a crossed-out red dot). Press .
- Select RESOLVE CONFLICT in the PROGRAM INFO screen.
- Select the title of the overridden program and press . The previously overridden program will now be recorded instead of the other program. Note: When you resolve a conflict, all of your other scheduled recordings will occur as programmed.
Manage Your Recordings For Browse, Playing And Replaying
View Your Recording Schedule
- Press RECORDED TV.
- Use the right arrow key to navigate to SCHEDULED. You will see a list of upcoming recordings in the order in which they will be recorded.
- Use the Arrow Keys to scroll through the list or use the button to scroll a page at a time.
- Select SERIES if you would only like to view the scheduled series recordings.
Cancel Future Recordings From The Recorded TV Screen
- Press RECORDED TV.
- Use the right arrow key to navigate to SCHEDULED. You will see a list of upcoming recordings in the order in which they will be recorded.
- If you want to cancel a series, use the right arrow key to navigate to SCHEDULED. You will then see a list of your scheduled series recordings.
- Use the Arrow Keys to scroll through the list or use the button to scroll a page at a time.
- Select the program or series you would like to cancel and press o.
- Select DON'T RECORD OF CANCEL SERIES from the PROGRAM INFO screen and press OK.
Cancel Future Recordings With The Program Guide
- Press GUIDE.
- Use the Arrow Keys to locate and select the program that is scheduled to be recorded.
- Press RECORD once to cancel a series recording or twice to cancel a single recording. The red dot or dots will disappear.
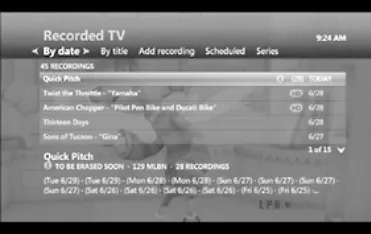
Check Your List Of Previous Recordings
PressRECORDED TV.- Your recordings will be listed by date with the most recent at the top.
- Select BY TITLE to sort your recordings by program title.
- Use the up and down arrow keys to scroll through your list of available recordings.
Watch Your Recorded Programs
- Press RECORDED TV.
- Use the up and down arrow keys to select the recorded program you would like to watch and press .
- Select PLAY to watch the program. Or select RESUME PLAY to begin watching the program where you previously stopped.
- Once a recorded program is finished playing a FINISHED screen will appear. Use the Arrow Keys to select DONE and then press OK.
Control The Recording With The Playback Buttons
- Press FF to skip ahead quickly or FWD to skip ahead in 30-second increments.
- Press REW to go backwards quickly or REPLAY to go backwards in 7-second increments.
- Press FF or REW up to three times to go forward or backward at increasing speeds.
- Press PAUSE to freeze the program. Press PAUSE again to resume viewing.
Stop Playing A Recording
- Press STOP at any time during a recording to stop viewing.
- Select DONE from the STOPPED screen and press . You can also choose START OVER to watch the program from the beginning or ERASE to stop watching and delete it completely.
Delete Existing Recordings
- Press RECORDED TV on your remote control.
- Select the program you would like to erase and then press OK.
- Use the Arrow Keys to highlight ERASE and press . Press ok again to confirm your selection.
Protect Recordings From Automatic Deletion
- Press RECORDED TV on your remote control.
- Select the recording you would like to keep and press .
- Highlight KEEP UNTIL and then select KEEP UNTIL I ERASE. Press.
Remote DVR (RDVR)
LFT Fiber's Remote DVR is available to all Digital Video subscribers (Digital Access or Digital Plus) who also subscribe to DVR service. You'll be able to access your access your business DVR system remotely, through your web browser or smart device. Free from LFT Fiber, Remote DVR manages your DVR recordings, including scheduling, deleting, editing and organizing. Because the LFT Fiber Remote DVR application communicates directly with your HD/DVR Digital Receiver, you must first create an account through the Remote DVR application on your TV. To create an account go to:
MENU>EXTRAS>APPS>press ok
- Find the Remote DVR icon press ok.
- Create your own username and password. You are now ready to begin managing and recording your favorite programs from your phone or PC. You may access a PDF of the Remote DVR manual by visiting our website at LFTFiber.com/video.
Answers To The Most-Asked Questions About LFT Fiber Video
Will the room-to-room DVR record on more than one TV in our office?
Yes! You can set and access recordings from every TV with an LFT Fiber HD Digital Receiver.
Can I record with the DVR and watch another channel while the room-to-room DVR is recording?
Yes, with your LFT Fiber Room-to-Room DVR you can record up to three programs at the same time. Or you can record two programs at the same time and watch a third program.
Can Parental controls be used on video on demand content?
Yes, you can lock Video on Demand content based on rating. You can also lock the purchase feature so that Video on Demand purchases are not made without your approval. To utilize parental locks you must first set up your Personal Identification Number (PIN). The PIN will be required when someone attempts to access locked content.
Do I need a pin to record a program that is locked by parental controls?
No, you do not have to enter your PIN to record locked content. However, anyone wanting to access the program to view it once it has been recorded (or even while it is recording) will have to enter a PIN.
Whom should I call if there is a disruption in my video service?
You should call 99-FIBER (993-4237) and select option 2, 2. You will be connected to one of our agents, right here in Lafayette. You should call this number to report any problems you encounter.
Trouble-Shooting Tips
The digital receiver won't turn on
First, check to make sure that the receiver is plugged in. If it is, try plugging a different device into the same socket to make sure there is not a problem with electricity flowing to the socket. If electricity is flowing to the socket, there may be something wrong with your remote control. If you are still having problems, call 99-FIBER (993-4237) and select option 2, 2.
The remote won't control the digital receiver
Press the button on the remote control. This will tell the remote that all controls will affect your set-top box or Digital Receiver. If you are still having problems, call 99-FIBER (993-4237) and select option 2, 2.
There is video, but no sound
First, check to make sure that the volume is not muted. Press on the remote or + on the VOLUME button. If the volume is not muted, then try changing the channel to see if the problem is only on that particular channel. You will also want to make sure that all of the connectors are secured properly to the Digital Receiver and to the TV. If you are still having problems, call 99-FIBER (993-4237) and select option 2, 2.
The sound is good but picture quality is poor
Make sure that all connectors are secured properly to the Digital Receiver and to the TV. Try changing the channel to see if the problem is only on that particular channel. If you are still having problems, call 99-FIBER (993-4237) and select option 2, 2.
The digital receiver will not respond
There is a green LED surrounding the Digital Receiver's power button that should flash each time a remote button is pressed. If the green light flashes when you press buttons on the remote but the Digital Receiver does not respond to your commands, you may need to restart your receiver. To restart, press and hold the Digital Receiver's power button for five seconds. If you are still having problems once the Digital Receiver has been restarted, call 99-FIBER (993-4237) and select option 2, 2.
The remote control is not working
First make sure there is nothing blocking the path between the remote control and the sensor on the Digital Receiver. Make sure you are aiming the remote directly at the sensor on the receiver and that you are no more than 20 feet away from the receiver. If your remote is still not working, try changing the batteries. If that doesn't work, call 99-FIBER (993-4237) and select option 2, 2.
Notes
Enjoy everything 100% Fiber has to offer with video, Internet and phone service.
Congratulations on reinventing your television viewing experience with the clear advantages of LFT Fiber. You can have that same level of quality, functionality and reliability in your business phone and Internet services, too.
You can customize a package to precisely fit your needs and tastes. You'll get one outstanding service package at one surprisingly affordable price.
Thanks for choosing LFT Fiber - Lafayette's only 100% fiber optic network.
Customer Service
1875 W. PINHOOK ROAD OR705 W. UNIVERSITY AVENUE99-FIBER (993-4237) | LFTFIBER.COM