LFT Fiber puts Lafayette’s premier fiber-optic phone system right in your hand.
You’re about to discover the total phone-service satisfaction of 100% fiber optic technology – with dozens of digital phone capabilities for your home that you can customize for you and your family. Exclusively from LFT Fiber, the only 100% Fiber-To-The-Home phone, television and Internet services provider in Acadiana.
No changes or surprises. You can keep your same phone number. You can make local calls to friends and relatives across the entire 337 area code at no additional charge. And, dialing 1+337 to numbers inside the 337 area code is no longer needed for LFT Fiber residential phone subscribers. You’ll also appreciate exceptionally low per-minute long distance rates for the Continental U.S. and 800+ international locations.
Now take a look at how fast and easily you can customize and put to work LFT Fiber phone service for you and your family. Whether you’ve selected Basic Line Service, with or without one of our features packages, or perhaps added some of our à la carte features, your LFT Fiber phone system is bringing value back to voice.
Thanks for talking with LFT Fiber.
Local, National and International Dialing
• Long distance in state and within the Continental U.S., dial 1, then the 10-digit number
(for example, 1-800-555-0123).
• To access international calling, contact LFT Fiber Customer Service at 99-FIBER (993-4237).
• To use calling features that require entering a phone number, always enter the complete
telephone number, including the area code.
Relay Systems for Communication Between Hearing Users and Deaf, Poor Hearing or Hearing/Speech Impaired Users
- Activate this relay system by pressing 1 + 7 1 1.
- You’ll be connected to a relay operator.
- You’ll be asked what number you wish to call.
- You’ll then ring the number.
You can access more information at www.hamiltonrelay.com. This service is available for local calls only.
Reporting and Tracing Objectionable Calls
If a severely objectionable call is received, hang up and immediately press * 5 7, then report the call to your local law enforcement authority. By pressing * 5 7, you authorize LFT Fiber to provide the call’s trace information to those authorities, should they need it during an investigation. Please note, an additional charge applies each time you use this feature.
LFT Fiber Phone Features Are Easy to Activate and Operate
Whether you’ve selected Basic Line Service, the Basic Features Package, the Premium Features Package, or any of our optional à la carte features, just check the table of contents for the pages that list easy-to-follow instructions for everything your LFT Fiber phone service offers.
Access Star Codes for LFT Fiber Phone Features
Use this list of access star codes to save time and simplify access and management of many features available with your LFT Fiber phone service. Some features listed require an additional fee, depending on your service package. Contact Customer Service if you have questions.

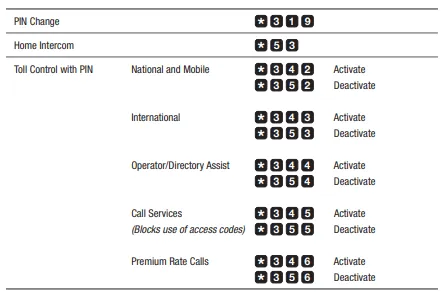
Setting and Changing Your PIN
Your phone service Personal Identification Number (PIN) is preset to 0000. This default number must be changed to any four-digit number of your choice the first time you use your PIN. PIN settings are applied per line and are required for Remote Access to Call Forwarding and Toll Control with PIN.
To Set Your PIN for the First Time:
- Press * 3 1 9.
- Enter 0000.
- Enter a four-digit PIN.
To Change Your PIN at Any Time:
- Press * 3 1 9.
- Enter your current PIN.
- Enter a new four-digit PIN.
Basic Line Service
This package level provides all the essentials of LFT Fiber phone service. In addition to a basic phone line, it includes these additional features at no extra charge:
- 3-Way Calling
- Call Waiting
- Anonymous Call Rejection
- Home Intercom
You can always upgrade to the LFT Fiber Basic Features Package, Premium Features Package, and/or add any of our À La Carte Features by calling LFT Fiber at 99-FIBER (993-4237).
3-Way Calling
3-Way Calling lets you talk with two people in different locations at the same time. Standard dialing rules apply (1+ area code for long distance numbers only).
- Dial the number of one of the parties to be included in the call and wait for that party to answer.
- Add a third party to the active call by pressing flash on your phone. Then dial the number of the third party.
- If the third party answers, press flash again to add both of you to the original call, connecting all three parties.
- If the third party doesn’t answer or the line is busy, press flash twice to rejoin the original call.
- If you hang up, you’ll receive a ring-back reminder that the original call is still on hold. Rejoin the call by picking up.
Call Waiting
When you’re on the phone, Call Waiting notifies you with a tone that a second call is on the line and allows you to switch between the calls.
- The new caller continues to hear ring-back until you answer the call.
- Press flash to switch between the calls.
- If you don’t switch to the new call within approximately 4 rings, it’s routed to your Voicemail if you subscribe to that service.
- If you hang up after switching to the new call and your original call is still on hold, you’ll receive a ring-back reminder to reconnect the call.
Call Waiting is always activated. It’s deactivated only on a per-call basis using Cancel Call Waiting.
Cancel Call Waiting
This function allows you to deactivate Call Waiting for an individual call, so important calls aren’t interrupted. Use Cancel Call Waiting by dialing * 7 0 before or during the call for which Call Waiting is to be cancelled.
- Cancel Call Waiting for the next call by pressing * 7 0 before the call.
- Cancel Call Waiting during an active call by pressing * 7 0 during the call, whether or not 3-Way Calling is activated.
Anonymous Call Rejection
Anonymous Call Rejection automatically rejects calls from individuals/parties who choose to withhold their information from Caller ID.
- Activate by pressing * 7 7.
- Deactivate by pressing * 8 7.
- An incoming call that’s rejected will not appear in any of your call lists.
- The caller will hear a message that you are not accepting calls at this time.
Home Intercom
This feature makes it easy to transfer incoming calls to someone else in your home or to contact them yourself – from and to any phone in your home.
Call Another Home Extension
- Pick up a home phone and dial * 5 3.
- Hang up after you hear the busy signal.
- All of your home phones will ring. Once someone in your home picks up an extension, your extension will stop ringing.
- After your phone stops ringing, pick up to connect with the extension you called.
- If there’s no answer on any extension after 10 rings, the intercom call terminates.
Transfer an Incoming Call to Another Extension
- While you’re on the incoming call, press the flash button on your phone and hang up.
- All of your home phones will ring. Don’t pick up from the home extension from which you called – wait for a pick-up on another extension.
- If there’s no answer on any extension after 10 rings, the outside call terminates, requiring the original caller to call again.
Basic Phone Features Package
With the Basic Phone Features Package, you receive all the features of LFT Fiber Basic Line Service, plus a wide array of additional features that add even greater value and convenience to your service, including:
- Automatic Callback
- Automatic Recall
- Call Forwarding
- Selective Call Forwarding
- Do Not Disturb
- Selective Call Acceptance
- Outgoing Call Blocking
- Selective Call Rejection
- Speed Dialing
Other Call Forwarding options are available as À La Carte Features. See page 29 for more information.
Automatic Callback
This simple timesaver lets you automatically redial the last outgoing call.
- Call back the last outgoing number by pressing * 6 6. (This feature can be used only if your most recent caller is an LFT Fiber phone subscriber, or a subscriber to certain other phone providers’ systems.)
- If the called number’s line is busy, callback is performed automatically as soon as the line becomes free. Your phone will ring with a distinctive tone to notify you that your callback attempt is going through to the other party.
- Cancel all outstanding callback attempts by pressing * 8 6.
- If the called party’s line doesn’t become free within 5 minutes, the callback attempt is terminated. It is also terminated if your line becomes busy before the Automatic Callback is completed.
Automatic Recall
Use this service to hear your most recent incoming caller’s number and then optionally return the call.
- Hear your most recent caller’s number by pressing * 6 9 and then optionally return the call by pressing 1. (The return call feature can be used only if your most recent caller is an LFT Fiber phone subscriber, or a subscriber to certain other phone providers’ systems.)
- If the line you call is busy, it recalls as soon as it’s free. You’ll hear a distinctive ring from your phone when the recall is answered. You can then pick up and complete the call.
- If the line stays busy for more than 5 minutes, recall terminates.
- Cancel Automatic Recall by pressing * 8 9.
Call Forwarding
When you’re not home, you can still answer your calls by activating Call Forwarding and Selective Call Forwarding. Call Forwarding sends all your calls directly to an alternate number you select, bypassing your home phone.
To activate:
- Press * 7 2.
- Dial the number to which you want your calls forwarded and wait for the confirmation tone.
- Hang up. Your calls will now be forwarded to the alternate number you entered.
- Deactivate by pressing * 7 3.
Selective Call Forwarding
With this forwarding service, you can forward calls from up to 10 phone numbers to a single phone number. For instance, if you have LFT Fiber service for multiple phone lines (a main phone line and a child’s phone line), you can forward both to an alternate number (a cell phone number, for example).
To activate:
- Press * 6 3.
- You will hear the current status of Selective Call Forwarding.
- Press 3 to turn Selective Call Forwarding off.
- Press 0 to hear the main instruction menu.
- Press # to add a number to the list.
- Press 1 to review the list of numbers.
- Press * to delete a number from the list.
Do Not Disturb
Temporarily block all incoming calls with the Do Not Disturb feature. You can still make outgoing calls, but an announcement tells callers that you’re not currently taking calls.
- Activate by pressing * 7 8.
- Deactivate by pressing * 7 9.
Selective Call Acceptance
Working with your Do Not Disturb feature, Selective Call Acceptance temporarily blocks your line from incoming calls but allows numbers that you’ve selected to come through. Outgoing calls can be made as usual.
To activate:
- Press * 6 4.
- You will hear the current status of Selective Call Acceptance.
- Press 3 to turn Selective Call Acceptance off.
- Press 0 to hear the main instruction menu.
- Press # to add a number to the list.
- Press 1 to review the list of numbers.
- Press * to delete a number from the list.
Activating or deactivating Selective Call Acceptance also automatically activates or deactivates your system’s Do Not Disturb feature.
Outgoing Call Blocking
Outgoing Call Blocking allows you to prevent calls being placed from your line. This applies to all calls, except emergency calls (such as 911). Request to activate or deactivate Outgoing Call Blocking by calling our customer service department at 99-FIBER.
Selective Call Rejection
You can filter out unimportant or unwanted incoming calls by using Selective Call Rejection. It rejects all calls from your list of callers and/or numbers you select, and announces that you’re not currently accepting calls. You can enter up to 10 numbers for call rejection.
To activate:
- Dial the access star code * 6 0.
- You will hear the current status of Selective Call Rejection.
- Press 3 to turn Selective Call Rejection off.
- Press 0 to hear the main instruction menu.
- Press # to add a number to the list.
- Press 1 to review the list of numbers.
- Press * to delete a number from the list.
Speed Dialing
This convenience feature lets you use one- or two-digit codes as shortcuts for dialing selected phone numbers. One-key codes must use numbers 2–9, and two-key codes must use numbers 20–49.
To Configure Speed Dialing With a One-Digit Code
- Press * 7 4.
- Press the one-digit code you want to assign (keys 2–9).
- Enter the phone number, including the area code.
To Configure Speed Dialing With a Two-Digit Code
- Press * 7 5.
- Press the two-digit code you want to assign (keys 20–49).
- Enter the phone number, including the area code.
To Place a Call Using Speed Dialing
- Key in the one-digit or two-digit code you’ve assigned to the number you wish to call.
- Wait four seconds or press #.
You can use Speed Dialing with other LFT Fiber phone features.
- After accessing Call Forwarding or Selective Call Forwarding, you can forward calls using the Speed Dialing codes you’ve assigned (either one-digit or two-digit).
- After pressing flash while on 3-Way Calling, you can use your Speed Dialing codes to set up the three-way call.
Premium Phone Features Package
When you order the Premium Phone Features package, you automatically receive all the features of LFT Fiber Basic Line Service and the Basic Phone Features Package, plus three of our popular premium features:
- Voicemail
- Caller ID
- Caller ID Blocking
- Call Waiting Caller ID
You also can select any of our À La Carte Features to further enhance your service. See page 29 for more information.
Voicemail
LFT Fiber Voicemail connects you to the easiest, fastest, most complete system for receiving and responding to home phone calls.
Activate Your Voicemail Account
Using your home phone, listen for the dial tone, then enter access star code * 9 8. During this initial sign-in, you will be prompted to complete three quick steps: create your PIN, record your name and create a greeting for your callers.
NOTE: Even before you set up your LFT Fiber Voicemail, callers can leave messages. Your service announces a standard greeting, and messages are saved for access after you set up and activate your Voicemail box.
NOTE: You can skip first-time sign-in by pressing * twice, but you must complete sign-in the next time you access Voicemail.
Create Your PIN
After pressing * 9 8, you’re prompted to create your new PIN. It must include four digits.
- Enter your new PIN, then press #.
- Confirm your new PIN by re-entering it and pressing #.
Record Your Name
Your personally recorded name is used by some of the system-generated announcements, such as when callers are greeted or when you leave messages for others.
- Record your name, then press #.
- You’ll hear a playback of your recorded name.
- Re-record it by pressing 1.
- Keep it by pressing #.
Create Your New Greeting
You can personalize your greeting by recording your own or choosing from several prerecorded options.
- Record your own greeting by pressing 1.
- Press # when you are finished.
NOTE: If your greeting is longer than 10 seconds, you’re prompted to record a shorter greeting.
You can also:
- Use a prerecorded, system-generated greeting that includes your recorded name and phone number by pressing 2.
- Use a prerecorded, system-generated greeting that includes only your phone number by pressing 3.
- Use a prerecorded, system-generated greeting that doesn’t announce your name or phone number by pressing 4.
- You’ll hear a playback of the greeting you created.
- Save and use the greeting by pressing #.
- Re-record or select a different greeting by pressing 1.
(For advanced Voicemail Greetings settings, see page 23; Manage Your Greetings.)
Keys to Accessing Voicemail Features
This map points out keys for instant access to many of the valuable capabilities your LFT Fiber Voicemail service offers.
After accessing your account, go immediately to any feature you wish by pressing the corresponding keys – even before or during the Main menu announcement.
- Listen to Messages
- 1 Repeat
- 2 Save
- 3 Delete
- 4 Reply
- 5 Send a copy
- Leave as new
- Send Message
- Work With Greetings Menu
- 1 Personal greeting
- 3 System-generated greeting & name recording
- 5 Busy greeting
- Exit
- Mailbox Settings
- 1 Group lists
- 2 Hands free and timesaver options
- 3 Security options (PIN, fast login, skip PIN)
- 5 Notification settings (Outdial notifications)
- 6 Additional settings (Broadcast options)
- 9 Live message screening settings
- Exit
- Review Deleted Messages
- 1 Repeat
- 2 Restore
- 3 Delete permanently
- 4 Reply
- 5 Send a copy
- Next message
- Exit
- Exit and Log in as Different User
- Help
* Exit
Collect Your Messages
Your LFT Fiber system makes it easy to access your Voicemail messages no matter what your schedule – keeping you up to date on your calls anytime, anywhere.
Log In and Manage Your Mailbox
- Log in and access your mailbox from your own phone by pressing * 9 8.
- Enter your PIN when prompted.
- If not calling from your own phone, key in your phone number.
- When you hear your Voicemail greeting, press * to log in.
- Enter your PIN when prompted.
After accessing Voicemail, you will go straight to your messages if autoplay is activated. (See page 25 for information on Autoplay.) Otherwise, you will go to the Main menu.
SECURITY NOTE: If the wrong PIN is entered, you’ll have three more attempts before the call is terminated. You can redial immediately and try again. But, three more incorrect PIN entries will lock you out for 60 minutes.
Navigate the Main Menu
The Main menu is your guide to all of your LFT Fiber Voicemail features. When you enter the Main menu, you will hear a welcome message, then a summary of messages in your mailbox.
See the Keys to Accessing Voicemail Features on page 19 for a quick-key map.
Check for New Voicemail Messages
If your telephone has a message indicator, it will light up when you have one or more new messages.
If your phone doesn’t have a message indicator, lift the handset. An interrupted dial tone indicates you have one or more new messages.
NOTE: If your mailbox is full or almost full, the system will alert you. Once full, new callers may not be able to leave messages until you delete some of your messages.
Listen to Your Messages
Review your messages by pressing 1 from the Main menu. New messages are played first, followed by previously saved messages.
Before each message, you will hear related information, including the time it was received and the sender’s name or phone number (if available). You will then hear the message.
Control Playback of Each Message
- 5 Decrease the volume of the message. Repeat for less volume.
- 6 Increase the volume of the message. Repeat for more volume.
- 7 Slow the playback of the message. Repeat for slower playback.
- 8 Pause playback for up to 20 seconds. Press 8 again to resume playback.
- 9 Speed playback of the message. Repeat for faster playback.
- 7 7 Go back 5 seconds.
- 9 9 Go forward 5 seconds.
Easily Manage Your Messages With These Quick Keys
After playback of each message, the system announces the following options. You can go to any of the options at any time with these quick keys:
- 1 Repeat the message.
- 2 Save as a new message.
- 3 Delete the message. If you change your mind, you can still access the message by pressing 6.
- 4 Reply to the message. (For messages from fellow LFT Fiber phone subscribers.)
- 5 Send a copy of the message to another LFT Fiber phone service subscriber.
- Leave messages as saved.
Reply to Voicemail
If a caller is a fellow LFT Fiber phone service subscriber, you can reply directly to his or her message from your Voicemail. You can also send a copy of the message to another phone number or create a new message.
- After listening to the message, press 4 .
- Record a reply message by pressing 2 . Follow the system prompts.
- Send a copy to someone else by pressing 4 . Follow the system prompts.
- Send a new message by pressing 5 . Follow the system prompts.
NOTE: Replies are sent to the original message sender’s voicemail. You cannot reply to system-generated messages or messages from non-LFT Fiber numbers.
- Exit by pressing * twice
Recover a Deleted Message
After you delete a message, you can recover and save it before you disconnect from your Voicemail box.
- To save a message deleted during your current connection, press 6 from the Main menu.
This plays your current deleted messages. Follow system prompts. - Return to the Main menu by pressing 3.
- Messages are permanently deleted after you disconnect from your mailbox.
Manage Your Greetings
Your greeting is the message played to callers when they reach your Voicemail. You can choose from a selection of different greetings, as well as create specific greetings to fit your personal preferences and schedule.
- Your personal greeting is your normal message. You recorded your personal greeting when you set up your account. See page 18 for more information.
- Instead of a personal greeting, you can choose a prerecorded, system-generated greeting.
Record a New Personal Greeting
You can change your personal greeting at any time.
- From the Main menu, press 3 to go to the Greetings menu.
- Set up your personal greeting by pressing 1. Follow the system prompts.
- Re-record your personal greeting by pressing 1, then press # when finished.
- Accept the new greeting by pressing 1.
- Re-record a new greeting by pressing 2.
- Exit without saving or re-recording by pressing 3. This saves the greeting you recorded previously.
Use an LFT Fiber System Greeting
Instead of a personal greeting, you can use an LFT Fiber system-generated greeting that includes your recorded name and phone number, or just your phone number.
- From the Main menu, press 3 to go to the Greetings menu.
- Set up your system-generated greetings in the Greetings menu by pressing 3.
- Choose the type of system greeting by pressing 1.
- Use a greeting that includes your recorded name by pressing 1. Follow the system prompts.
- Use a greeting that includes your phone number by pressing 2. Follow the system prompts.
- Use a greeting that does not include your name or phone number by pressing 3. Follow the system prompts.
- Review or re-record your name by pressing 2. Follow the system prompts.
- Exit and return to the Main menu by pressing *.
Mailbox Settings
The Mailbox Settings menu allows you to change mailbox settings such as your PIN and other options that help secure your account and save time.
Group Lists
Set up and manage lists of phone numbers of groups of contacts to which you regularly send messages. Once a list is created, you can send a message to everyone on the list at the same time.
Add a New Group List
- From the Main menu, press 4 to access Mailbox Settings.
- Press 1 for Group Lists.
- Press 1 to create a new group list
- Enter a number (1-99) for the new group list, then press # . Follow the system prompts.
Edit a Group List
- From the Main menu, press 4 to access Mailbox Settings.
- Press 1 for Group Lists.
- Edit an existing group list by pressing 2. Follow the system prompts.
Review a Group List
- From the Main menu, press 4 to access Mailbox Settings.
- Press 1 for Group Lists.
- Review a group list by pressing 3. Follow the system prompts.
Change Your Autoplay Settings for Messages
Your account is set to play the Main menu after you log in. Autoplay takes you past the Main menu and directly to your messages when you enter your mailbox. This Hands Free feature means you don’t have to press any buttons to hear your messages.
- From the Main menu, press 4 to access Mailbox Settings menu.
- Press 2 to go to Hands Free and Timesaver options.
- Change the autoplay settings of your standard messages by pressing 1. Follow the system prompts.
Change the Playback of Message Headers and Bodies
The time and date of each message is always recorded when a caller leaves a message for you. This information is the message header. The message itself is the message body.
You can choose whether the message header is played before each message.
NOTE: You can’t turn off both the playback of message headers and message bodies. If you turn off the playback of one, the system will automatically activate the other.
- From the Main menu, press 4 to access Mailbox Settings menu.
- Press 2 to go to Hands Free and Timesaver options.
- Change whether the message headers or bodies play for your Voicemail messages by pressing 3.
Change Your Message Delivery Options
You can choose to have messages delivered to your email inbox and/or have them automatically sent as a text message to your phone.
- From the Main menu, press 4 to access Mailbox Settings.
- Press 5 to go to Delivery Options.
- Follow the system prompts to set your preferences for message delivery.
- You will hear whether the message header or message body is set to play. Follow the system prompts.
- Switch playback of the message body on or off by pressing 1 .
- Exit by pressing * .
Manage Your Security Options
You can control important security options on your LFT Fiber Phone service like changing your PIN, activating and deactivating PIN skipping, plus fast log-in.
Change Your PIN
- From the Main menu, press 4 to access Mailbox Settings.
- Press 3 for Security Options.
- Change your PIN by pressing 1. Follow the system prompts.
Skip PIN
Skip PIN lets you enter your mailbox without using a PIN when calling from your home phone.
NOTE: Skip PIN significantly reduces the security of your account. Any person with access to your phone will be able to use your Voicemail services.
- From the Main menu, press 4 to access Mailbox Settings.
- Press 3 for Security Options.
- Press 3 to hear the current setting for PIN requirement. Follow the system prompts.
Control Fast Log-In
To log into your account from another phone, you must enter your phone number and PIN.
Fast Log-In lets you access Voicemail from your home phone (the phone number associated with your account) without entering your phone number before your PIN.
You can deactivate Fast Log-In so that the associated phone’s number must always be entered, no matter what phone is used.
- From the Main menu, press 4 to access Mailbox Settings.
- Press 3 for Security Options.
- Press 2 to hear whether or not Fast Log-In is active. Follow the system prompts.
Follow the same steps above to reactivate Fast Log-In.
Caller ID
You’ll use this popular feature before answering virtually every call you receive. It identifies the incoming caller’s name and phone number while the phone is ringing. Caller ID is automatically activated when you subscribe to the Premium Services Package.
Caller ID will not display the calling number for:
- Withheld numbers (Callers wishing to remain anonymous may withhold/block their phone number.)
- Some international calls
- Some calls from older parts of the telephone network
Caller ID Blocking
You can withhold your own number by blocking Caller ID for any outgoing call you make.
- Press * 6 7, then dial the number you want to call.
- Your Caller ID automatically reactivates after you finish your outgoing call and hang up — so you must repeat step 1 every time you want to block your Caller ID (withhold your number) on other calls.
NOTE: The LFT Fiber system will override blocking on your outgoing Caller ID if an emergency number (such as 911) is called. If the system identifies a number as an emergency call, the calling number is always delivered.
NOTE: If you subscribe to the Caller ID feature, your phone must have a display screen to utilize Caller ID.
Call Waiting Caller ID
When you’re on the phone, Call Waiting with Caller ID notifies you with a tone that a second call is on the line and displays the caller’s name and/or phone number. This gives you the information to decide whether to switch between the calls, cancel Call Waiting immediately or take no action, which routes the new call to your Voicemail if you subscribe to LFT Fiber Voicemail service.
- Activate Call Waiting with Caller ID by pressing * 6 5.
- Deactivate Call Waiting with Caller ID by pressing * 8 5.
À La Carte Features
Whether your service includes LFT Fiber Basic Line Service, with or without a Basic Phone Features Package or Premium Phone Features Package, you can further upgrade and customize it with any of these à la carte features. To include any of them in your service, just call 99-FIBER (993-4237).
- Call Forwarding Busy
- Call Forwarding Do Not Answer
- Toll Control with PIN
- Privacy Defender
- Teen Line
- Warm Line
Call Forwarding Busy
When your own phone line is busy, you can forward additional incoming calls to another number.
- Press * 9 0.
- You’ll hear a confirmation tone.
- Enter the number to which you want your busy-line calls forwarded, then hang up.
- Deactivate Call Forwarding Busy by pressing * 9 1.
Call Forwarding Do Not Answer
This feature is helpful when you are unavailable to answer your phone. You can forward incoming calls to another phone number after a predetermined number of rings.
- Press * 9 2.
- You’ll hear a confirmation tone.
- Enter the number to which you want your unanswered calls forwarded, then hang up.
- Deactivate Call Forwarding Do Not Answer by pressing * 9 3.
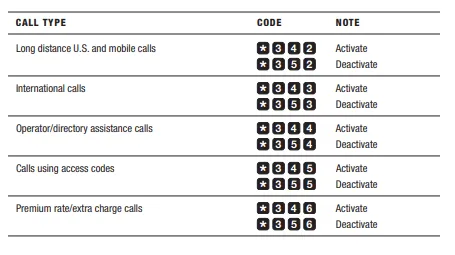
Toll Control with PIN
Toll Control with PIN enables you to prevent specific types of calls being placed from your line. To activate or deactivate for various call types, use the access star codes in this chart. Please note, you will need to enter your PIN number. (See Setting and Changing Your PIN, page 5.)
Privacy Defender
This safeguard system provides an extra level of privacy from unwanted calls. It will ask your callers to record their names before you answer. This allows you to reject any unwanted calls.
- To control Privacy Defender, dial the Privacy Defender access number: 337-534-0073.
- Privacy Defender first checks your telephone number to ensure that you are subscribed to the service. If you hear a message saying you aren’t subscribed to Privacy Defender, call LFT Fiber at 99-FIBER (993-4237) to subscribe to the Privacy Defender service.
- If you are subscribed to Privacy Defender, you’ll hear a message telling you whether the service is turned on or off, and how to use the keys on your telephone to control it.
- Press 1 to turn ON or OFF.
- You will hear a message indicating status.
- Press 2 to set or clear bypass code.
- You will hear a message giving new options.
- Press 1 to change code.
- Key in new 3-digit code or press 9 to cancel.
- Press 2 to clear code.
- Press 3 to change language.
- You will hear a message giving new options.
- Press 1 to select English.
- Other languages are not available with this service at this time.
- Press 9 to exit.
Turn Privacy Defender On or Off
- Turn Privacy Defender on or off by pressing 1 from the Main menu.
- You’ll then hear a message to confirm your latest update of the system.
- When Privacy Defender is turned off, it allows all calls to your telephone, whether or not they are from anonymous numbers.
Manage the Bypass Code
The bypass code allows important calls to get through, even when Privacy Defender is active.
- To change your bypass code or code, or to clear it, press 2 from the Main menu.
- You’ll hear a message stating your current code (if you have one) and giving you another menu of options for managing it. After using any of these options, you’re returned to the Privacy Defender menu.
- Set a new bypass code by pressing 1. Then key in the new three-digit bypass code you’ve chosen.
- To leave the previous bypass code unchanged, press 9, then wait to hear a confirmation before pressing any other keys. (You can use 9 as the first digit of your new bypass code, but you must key in the other two digits of the code immediately after the 9 without pausing.)
- To clear the bypass code so that callers can’t bypass Privacy Defender, press 2.
- To return to the Privacy Defender menu without changing the bypass code, press 9.
- The previous bypass code is left unchanged.
NOTE: If you set a new bypass code, remember to give the new code to any callers who need to bypass Privacy Defender. They will need to press * followed by the new code when they hear the Privacy Defender prompt. If you clear the bypass code, callers will not be able to bypass Privacy Defender until you set a new code.
Exit Privacy Defender
Exit Privacy Defender by pressing 9 when you hear the Main menu (before or after using other options) or hanging up.
Teen Line
This versatile feature allows your main line to support up to three additional numbers. Calls to the additional numbers are sent to your main line, with a distinctive ring for each additional number. Outgoing calls may be made only from the primary number.
As the name implies, this feature is popular for identifying calls for the children in a household. Yet, Teen Line has other practical applications, as well:
- For home businesses, a single line to separate incoming home and business calls.
- A “hotline,” with a phone number given only to high-priority callers.
- Useful as a dedicated number for a fax machine.
Using Teen Line with Other LFT Fiber Phone Features
Teen Line can interact with some additional features, such as Call Forwarding, Caller ID, Incoming Call features and Voicemail. Note the following details on each service.
- Call Forwarding allows Teen Line to use all Call Forwarding features.
- Call Forwarding-Busy treats all lines as busy if any line associated with the main line is busy, including any Teen Line or the main line itself.
- When a call to a Teen Line is forwarded, the Teen Line number appears as the forwarding number in Caller ID.
- Caller ID is available on Teen Line and will display the caller’s name and number.
- Automatic Recall, Automatic Callback and Call Trace can be set up only on the main line number, but will use the number of the last caller to the main line or any of its Teen Lines.
- Selective Call Rejection and Anonymous Call Rejection are available for Teen Line independently of the main line number. However, Teen Line cannot automatically add the last incoming call to the Call Rejection list. For the main line, the last incoming call can try to be added to the Call Rejection list.
- Voicemail mailboxes are available to Teen Lines as separate mailboxes for each line. If Teen Lines have their own mailbox, a caller using the Voicemail access star code is prompted to select the appropriate mailbox to access.
- Call Waiting cannot be set up for a specific Teen Line. However, if it is activated, it will announce Call Waiting calls to the main line and any Teen Line, with a distinctive ring if it is for any Teen Line.
Warm Line
This service means peace of mind, safety – and could be a lifesaver. It automatically calls any number you choose to alert when your phone’s handset stays off the hook for more than 16 seconds without a number being dialed. This service can be set to call an emergency number such as 911, or the number of a relative, neighbor or caregiver.
Warm Line is automatically activated and the forwarding number is programmed when you subscribe.
All Business Hosted Voice from LFT Fiber
Every customer call is critical – it can be the difference between winning or losing business. So no matter how small your business, you should have access to the same features and professional functionality of a big company.
With All Business Hosted Voice, LFT Fiber delivers a best-in-class phone system with all the bells and whistles of a big company phone system at an incredibly attractive price. Everything you need is included – phones, equipment, installation and training. Advanced features and easy administration via a web portal make Hosted Voice the last phone system you’ll ever need.
Call 99-FIBER (993-4237) or visit lftfiber.com for full details.
Thank you for choosing LFT Fiber – Lafayette’s only 100% fiber-optic network.
Congratulations on bringing value back to voice with the clear advantages of LFT Fiber phone service. You can have the same level of quality, functionality and reliability with your television and phone services.
Bring home everything 100% fiber optics have to offer.
Customer Service
1875-B W PINHOOK RD | 2701 MOSS ST
99-FIBER (993-4237) | LFTFIBER.COM
LFTF107a NOV2017